YOUR GUIDE TO:
BASIC WEBSITE EDITING
Congratulations, you launched your brand-new website for your business!
Now, it’s time to learn how to make updates and add to it for best digital marketing practices. Want to learn more?
GLOSSARY
- Logging In
- Users
- Add a User
- Forgot Password
- Editing User Access
- Basic Site Info
- Adding a Blog
- Editing a Current Blog
- Blog Categories
- Page Status (Draft, published, private, etc.)
- Creating a New Page
- Adding a New Page to Main Menu
- Rows
- Columns
- Content Blocks
- Publish Box
- Headers
- Textblocks
- Using Links
- Linking to an image/file
- Single Image
- Background Image
- Adding Video to Background
- Buttons
- Creating Anchors
- Editing Accordions
- Advanced Slider
- Advanced Image Gallery
- Advanced Image Carousel
- Advanced Video Gallery
- Embedded Video
Advanced Custom Fields (Menus, agents, etc.)
- Client Reviews/Testimonials
-
- Editing a Current Form
- Adding a New Form
- Changing the Recipient Email for Forms
- Where to find Form Entries
- Adding an Event
- Recurring Events
- Edit Event
- Editing the Footer
- Adding a Widget
- Adding Social Media to Footer
- Adding Social Media to a Page via Content Block
- Editing the Main Menu
- Adding a Page to the Main Menu
- Adding an Anchored Section to the Main Menu
- Adding a Custom Link to the Main Menu
- Removing a Page from the Main Menu
- Editing Your Logo and Favicon
WEBSITE ACCESS
Logging In
To access the backend of your website, go to your browser and type in your domain, followed by, “/wp-admin”
Example: yourwebsitename.com/wp-admin
🛈 Some developments may also use /wp-login or /backend
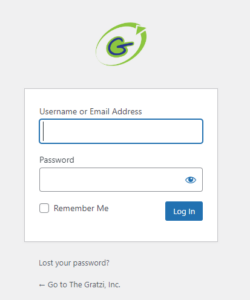
Once the login screen loads, enter your credentials and select, “Log In”
🛈To reset your password, select “Lost your password?“
Users
Any person(s) who has access to your website can be found under, “Users” in the black charcoal bar on the left side of your dashboard.

To add a New User, simply click “Add New.“
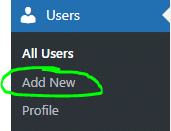
To edit a User, click “Edit” To send a password reset, click “Send password reset.“

DASHBOARD
Your WordPress Dashboard
The dashboard is the first place you are brought to when you log in. This is the main screen of your admin area. Feel free to explore the shortcut opportunities here, but any changes you need to make will live under the black, charcoal bar on the left.

Contact Info
Editing Your Site's Contact Info
In recent developments (2023), contact info lives under Website Settings → Basic Site Info
Once you update the contact information here, the contact info is dynamically changed throughout the site.
🛈 Sometimes contact info on a page is set up in a content block. If contact info is not changing after following the steps above, you can change the information this way.

Blog
Blog Entries
To add a new blog post, navigate to Posts → Add New
Then, fill out the fields from top to bottom making sure to include the Name, Body text, Category, and Featured Image. Publish your page.
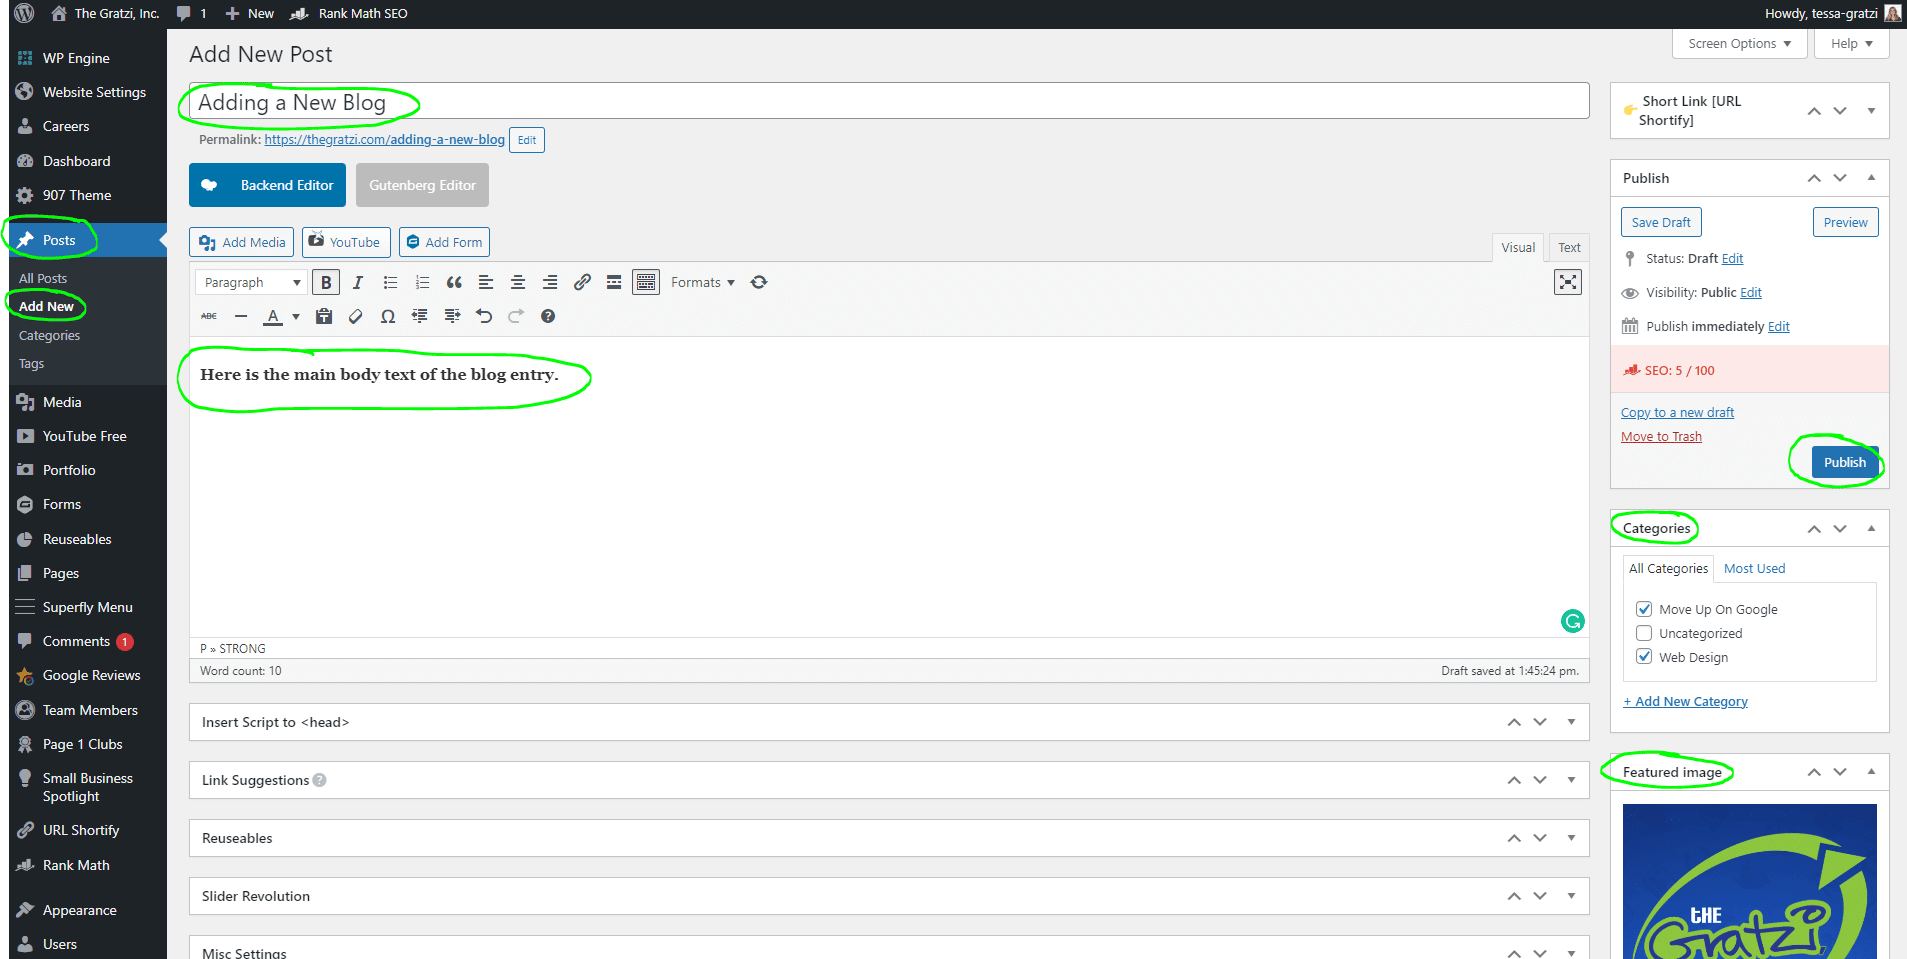
To edit an existing blog post, navigate to Posts → All Posts
Then, hover over the post title you would like to edit, and click Edit.

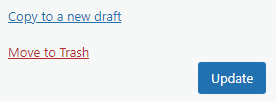
Once you’ve made your edit, make sure to click Update in the Publish box.
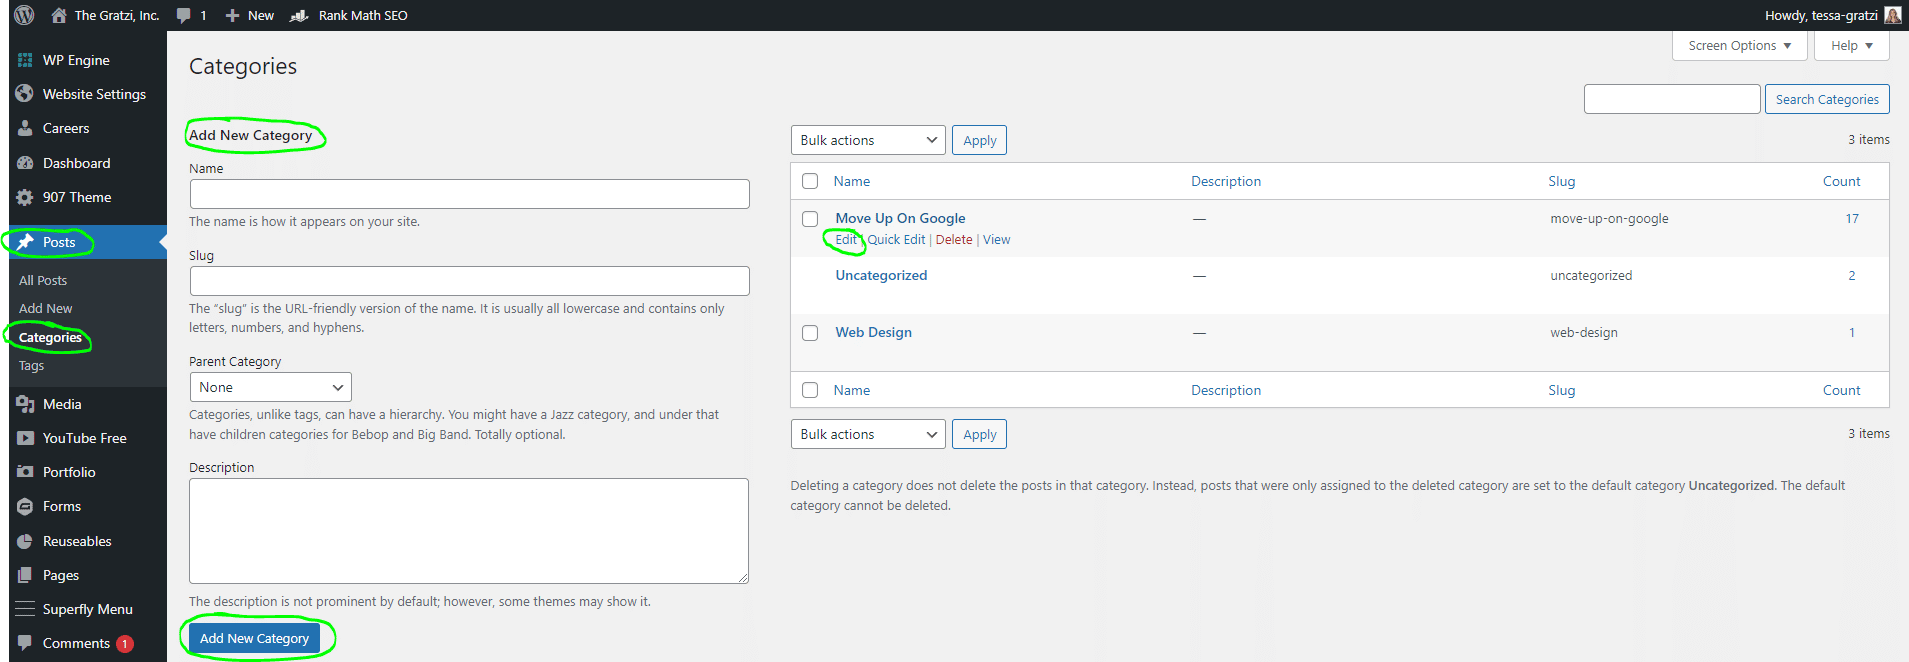
To manage your Blog categories, navigate to Posts → Categories
Here you can add a new category, or edit a current one.
🛈 Adding Categories to your posts make it easy for users to find similar posts!
Media Library
Adding Media To Your Library
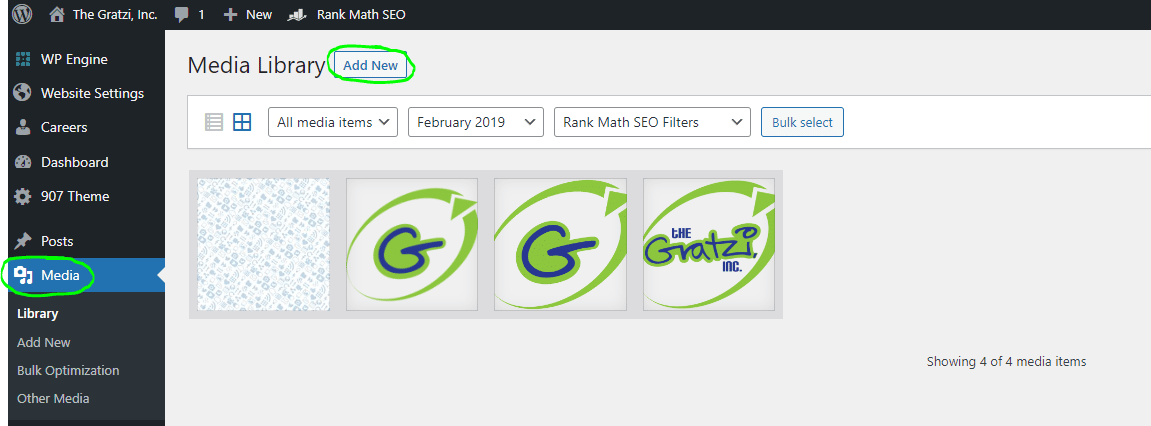
Your Media Library is where all media that lives on your website is stored. (images, videos, PDFs, etc.)
You can either drag and drop new files into the library, or you can upload using the Add New button.
Pages
Your Website's Pages
Pages is a collection of all the “pages” that make up your website.
Navigate to Pages → All Pages
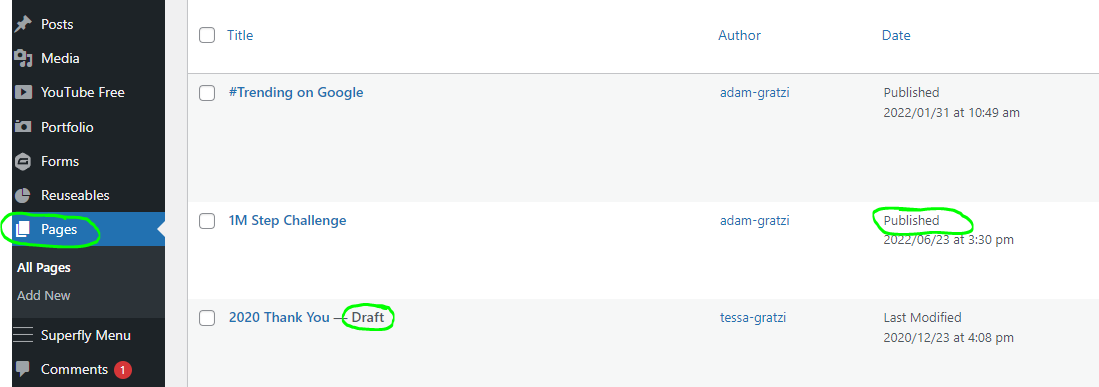
🛈 From here, you can also see the Status of your pages
Page Status
To change the status of a page, hover over the page title and click Quick Edit. Choose a page status, then Update.


🛈 Changing the Status is useful if you want to temporarily hide a page from your website. For example, you can create a page for a special event and keep it as a draft. When the event is live, change it to published to make it visible. After the event, you can change it back to draft instead of deleting it.
Creating A New Page
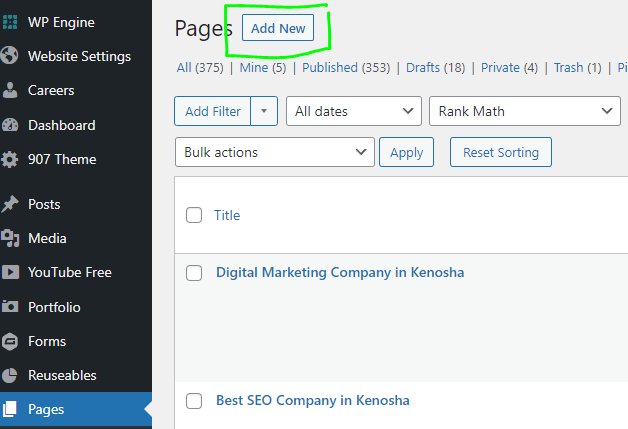
To create a new page, click New Page in the Pages menu
Adding A New Page To The Main Menu
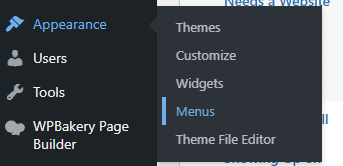
In the charcoal sidebar menu, hover over Appearance and click on Menus.
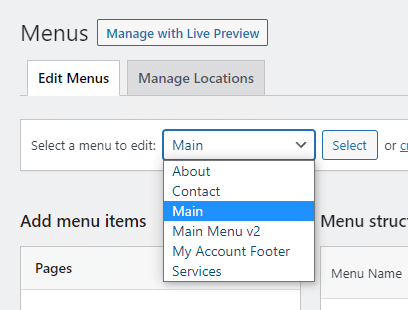
In the Select a menu to edit dropdown, select Main and click Select
Find and select the page you want to add to the Main Menu. Then click Add To Menu.
🛈 You can view all pages or search by selecting the tabs near the top
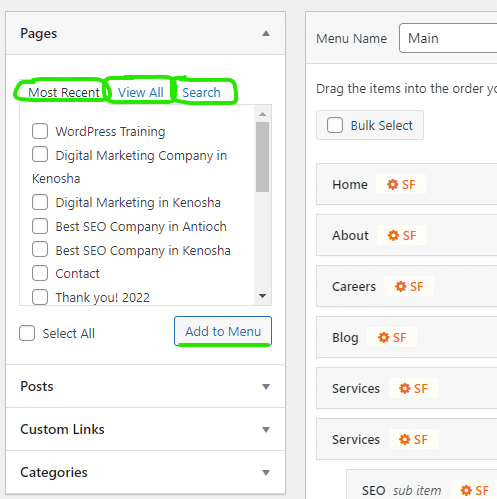
Your selection will be at the bottom of the list of pages. Drag and drop the gray tile to the position you want. When you’re done, click Save Menu near the bottom of the page.
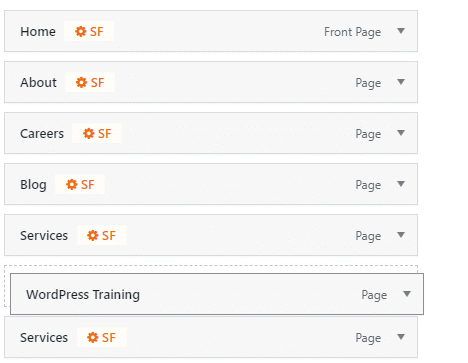
🛈 You can also “nest” your page within another menu item. While dragging, move the tile slightly to the right. It will snap into place and nest under the tile above it
Editing A Current Page
Editing a Current Page
To edit a current Page on your website, navigate to Pages and select the Page that you would like to edit from the list. (Either click on the page name, or select Edit while hovering over the Page title).
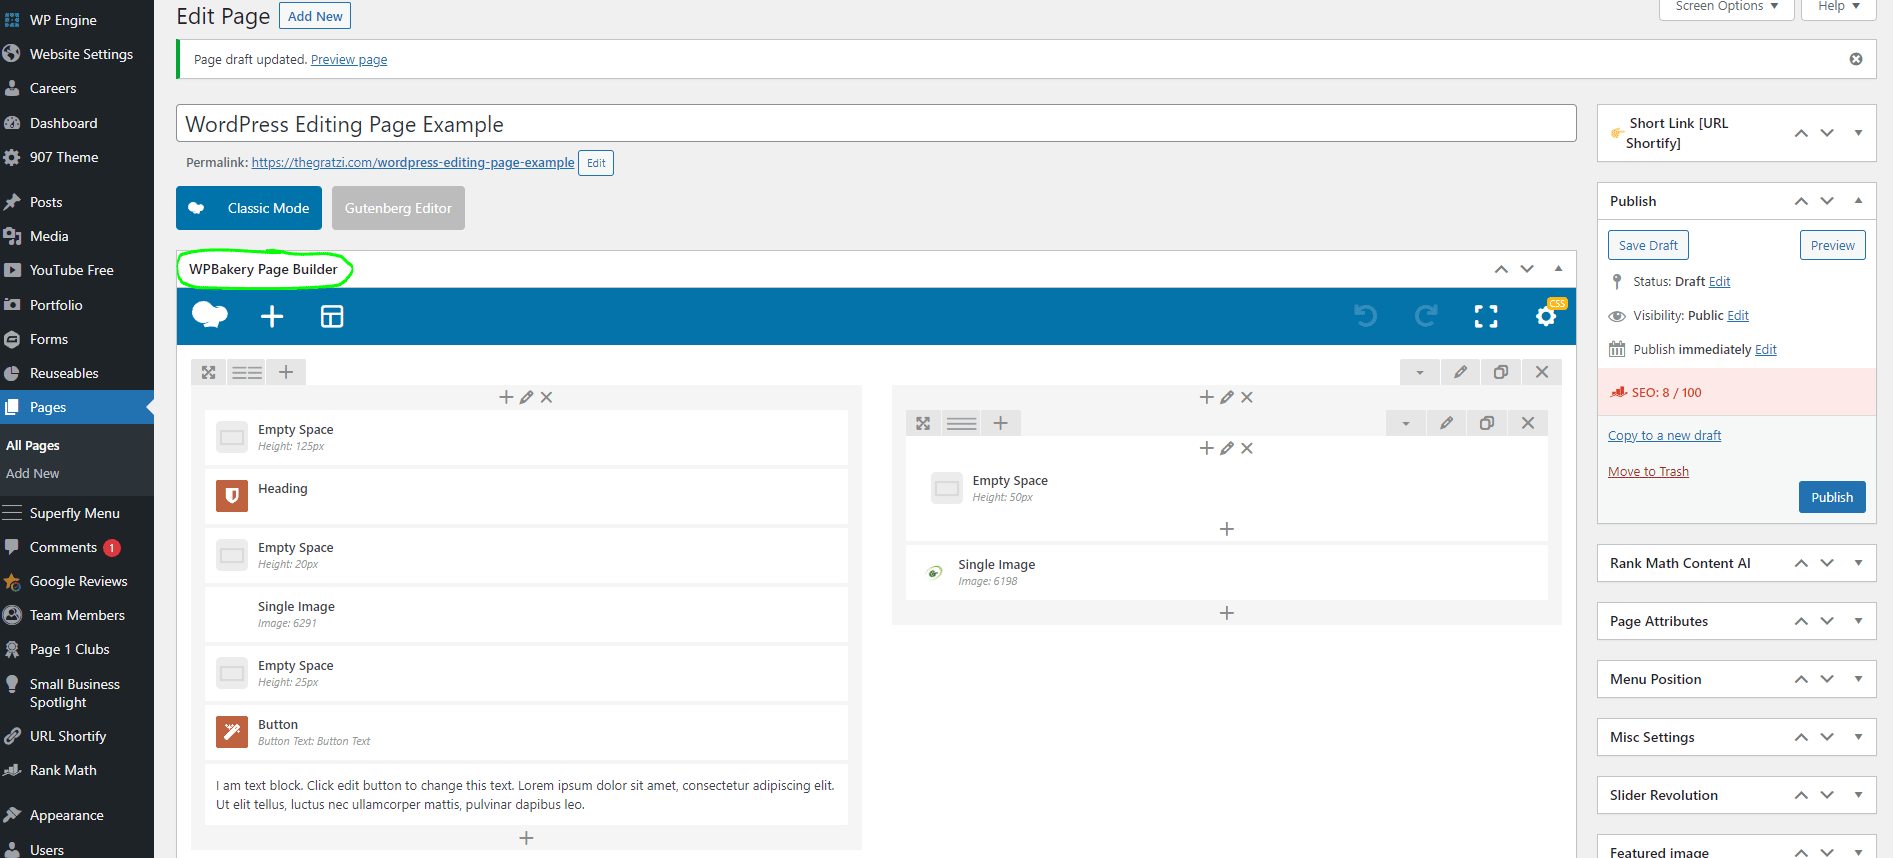
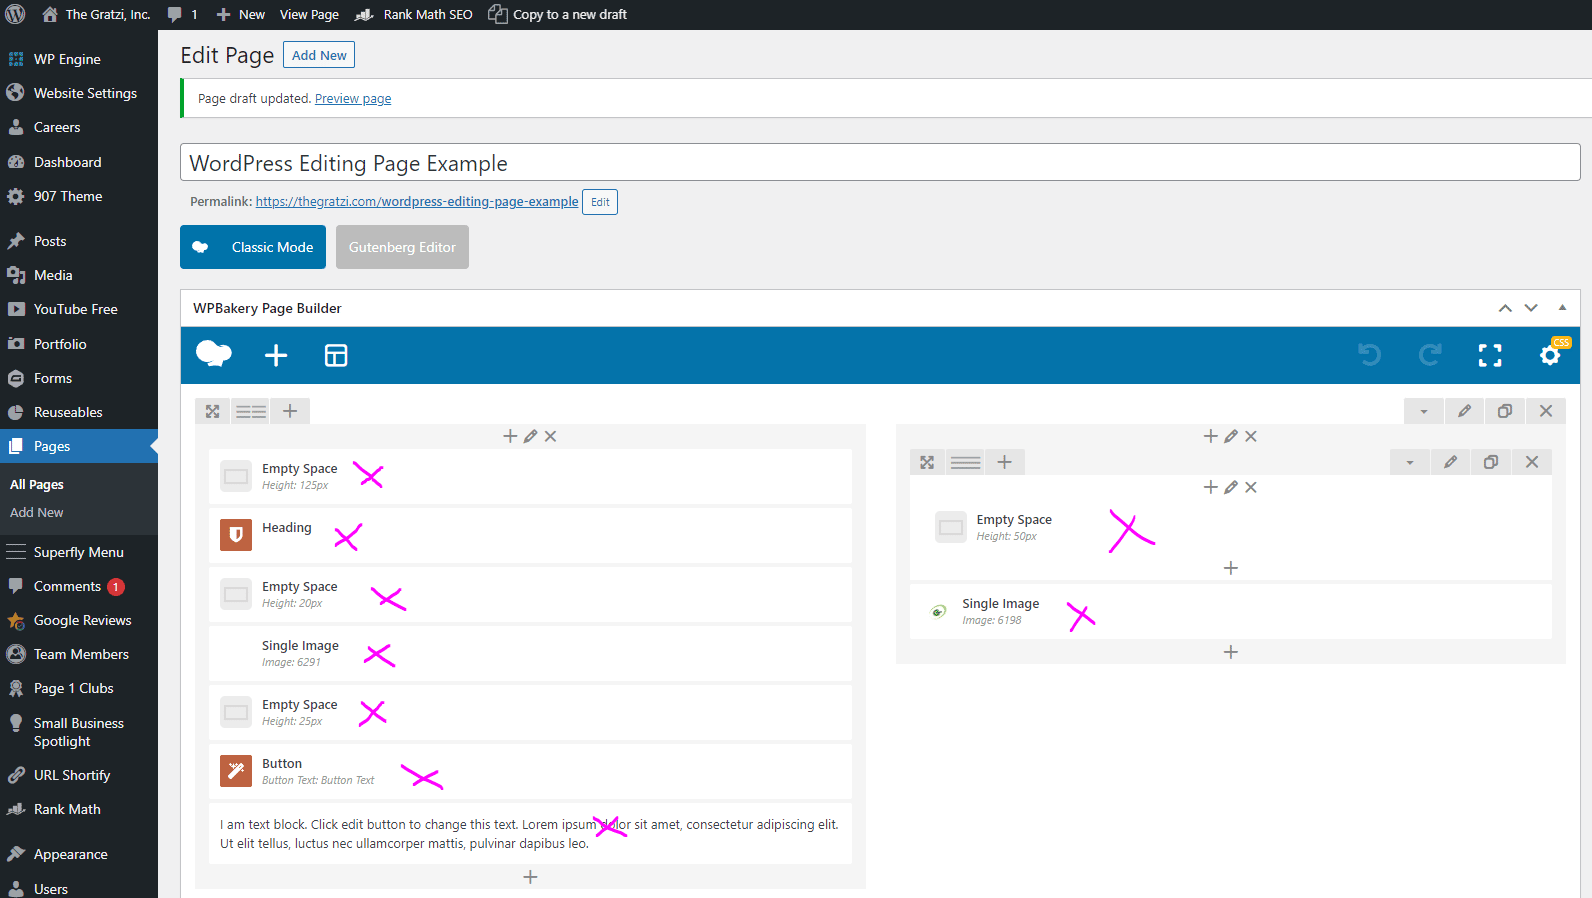
This will open WP Bakery, your page editing tool! In the example below, we are editing the page titled, “WordPress Editing Page Example“
Rows
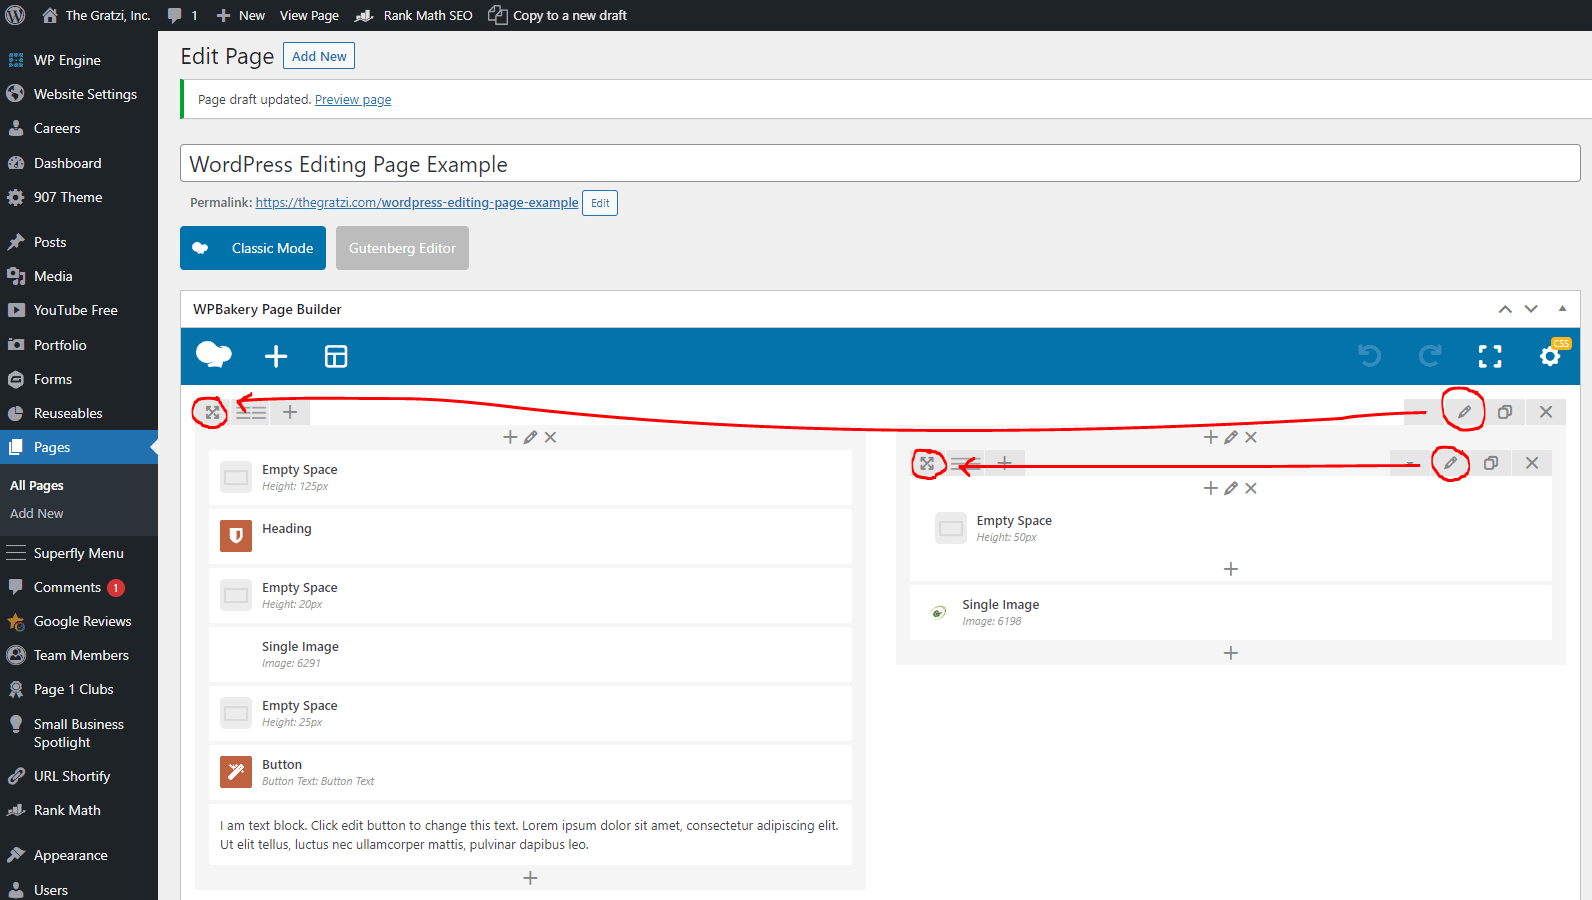
Rows are the main content element of your site. Rows can have Columns within them. The Columns house your content in Content Blocks.
You can identify a section as a row when there is a drag handle attached to the row settings (the pencil icon). In the image below we have a standard row, and also an “inner row” shown in red.
Columns
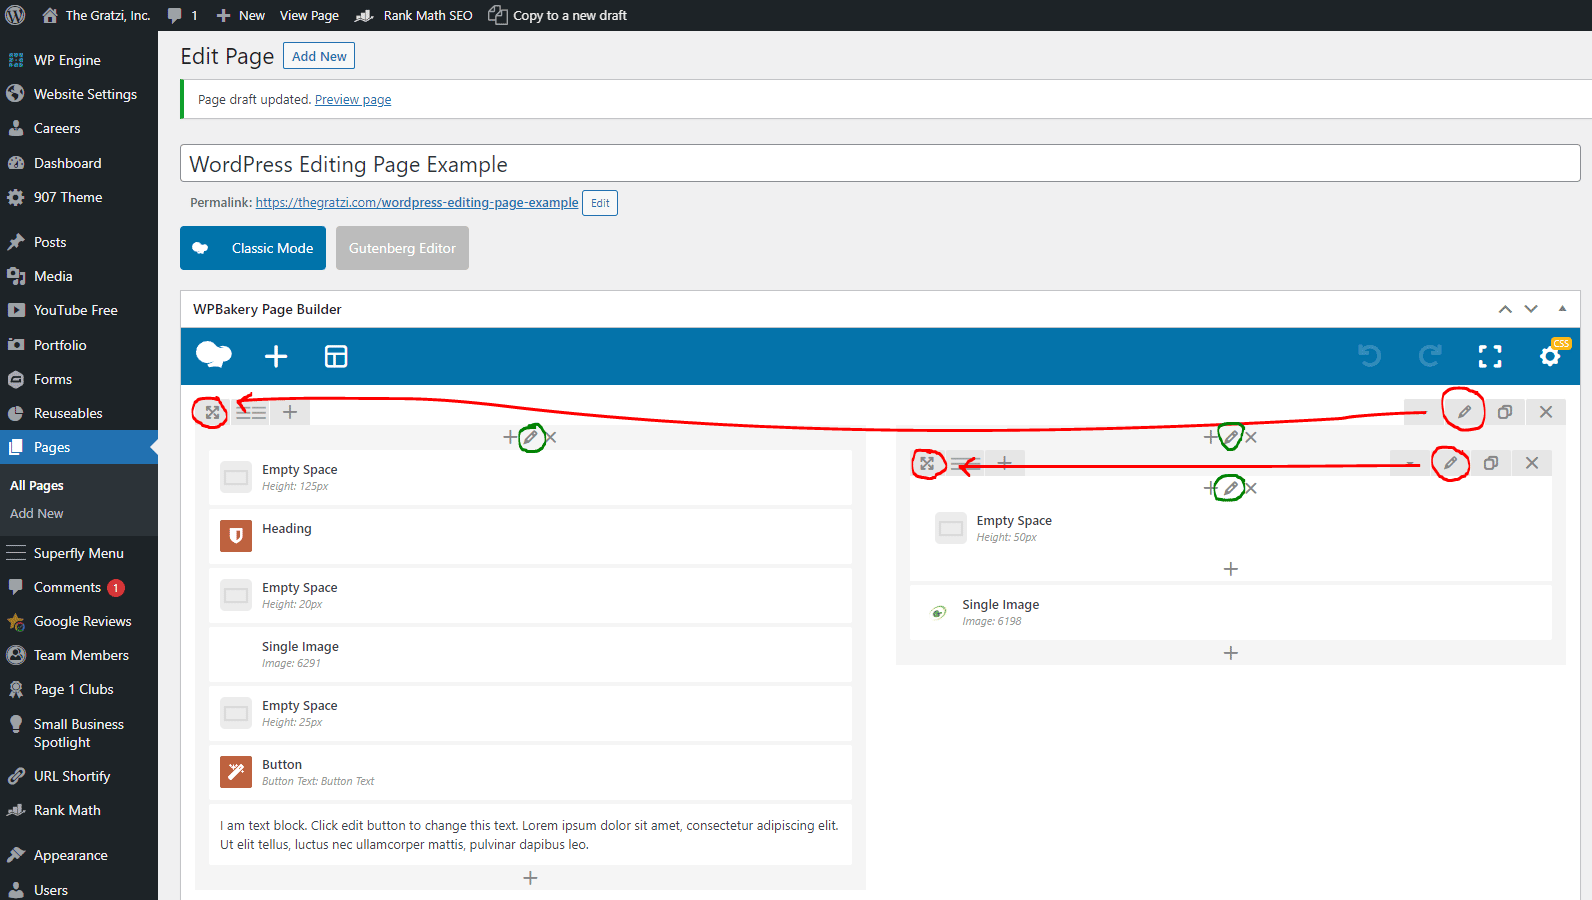
Columns are part of the rows, and they hold all your content blocks.
In the image below we have a standard Row, and also an Inner row shown in red. The Columns are circled in green.
Content Blocks
Content Blocks are how we show off text, images, and the rest of your content within the columns.
In the image below the Content Blocks are marked in pink.
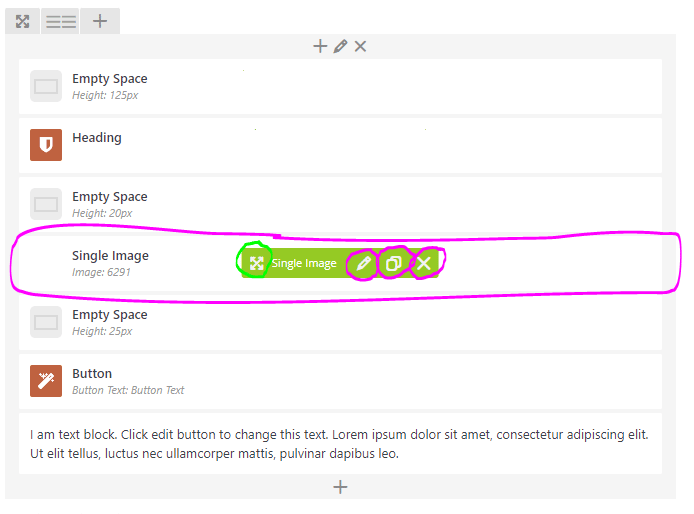
🛈 All content blocks have the same hover options. (Edit, Clone, & Delete)
Pencil Icon = Edit
Clone Icon = Duplicate the content/Make a copy
X Icon = Delete
The drag handle circled in green allows you to move the content block to any column you want.
Publish Box
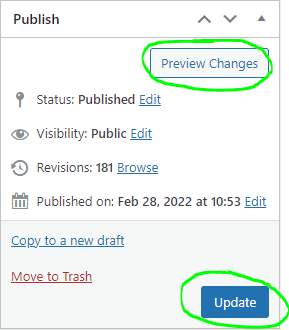
The publish box is going to be your best friend when it comes to making edits to your website. Clicking Preview Changes opens a new tab that shows you a preview of the page you are working on. Update saves your changes and makes them live.
🛈 If you are making a lot of changes to a page, be sure to preview and update often!
Headers
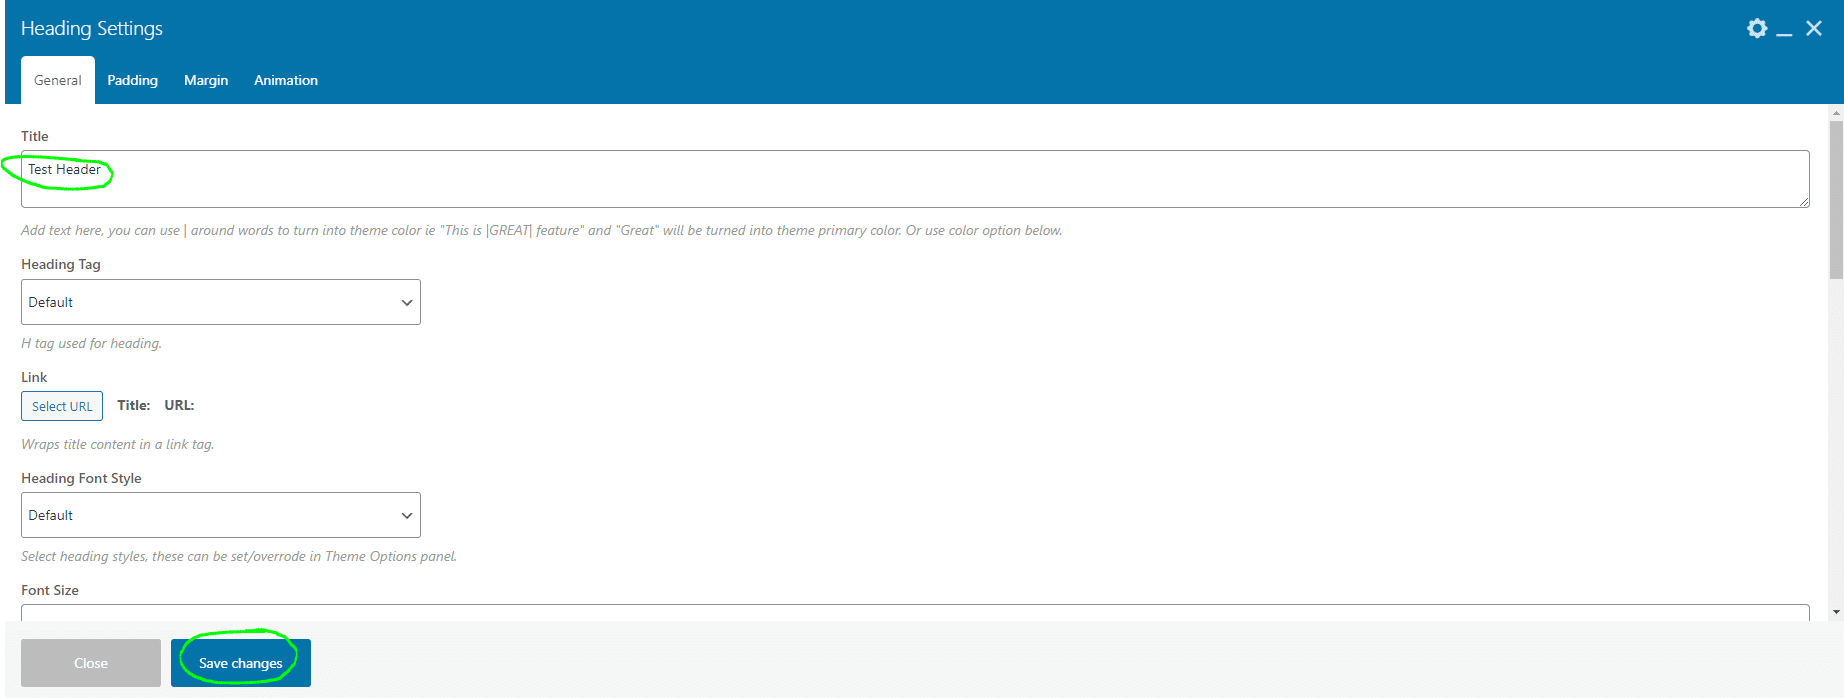
When you are ready to edit a Header Content Block, simply hover over the element and click on the pencil icon.

Enter the new Header under, “Title”. Save Changes and Update your page.
Text Blocks
Find the textbox you want to edit. Hover over the section, and click the Pencil icon to edit the text.
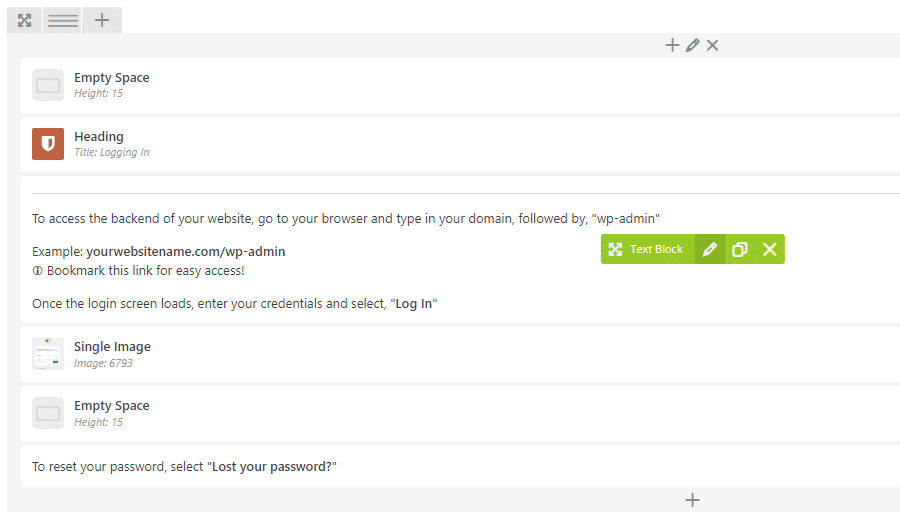
Edit the text the way you like. When you are done, Save Changes and update.
🛈 I see text on the front end of my website, but the text block is blank! Sometimes the text is colored white. In the backend, you won’t be able to see it. Simply click into the text editing window and press CTRL+A. This highlights any text so you can see it.
Using Links
You will find several places on your website where you can use links. For example: Buttons, Images, and Menus.
You can also add links directly into textblocks by following the steps below.
Hover over a text block and click the Green Pencil Icon.

Highlight the text you want to add a link to and click the link button (chains icon). Then add the URL you want and click the blue arrow icon. Save your changes and update.
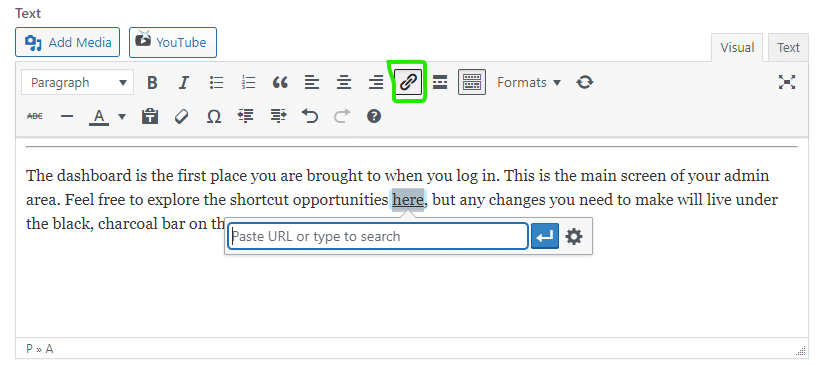
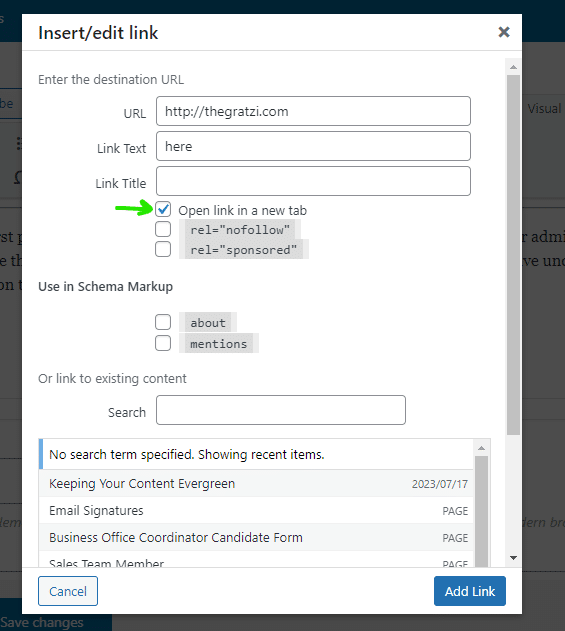
IMPORTANT: If you want to link to a page that is NOT on your website, you have to set the link to open in a new tab. Click the gear icon and select open link in a new tab. Save your changes and update

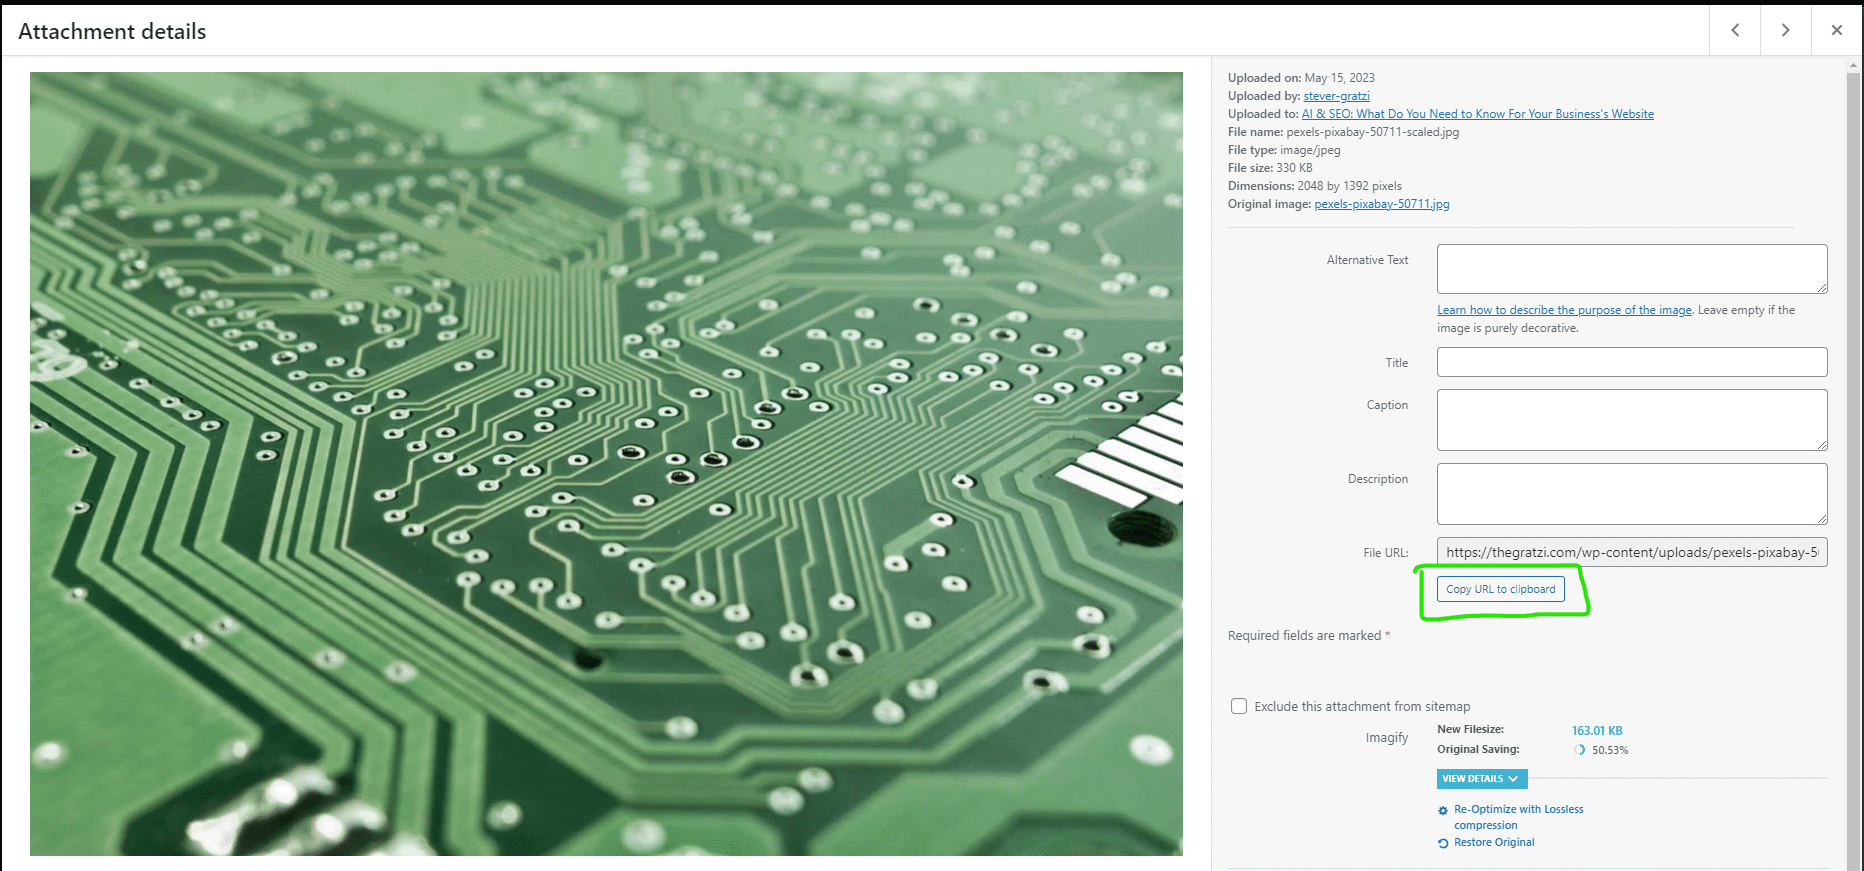
🛈 You can also link to an image or document in your Media Library . This is especially usefull for PDF menus or catalogs.
To do this, go to your media library and select the image or document you want. In the Attachment Details window, click the Copy URL to Clipboard button. You can then use this URL as a link destination.
Editing a ``Single Image``
Find the image block you would like to change, hover over it, and click the pencil icon.
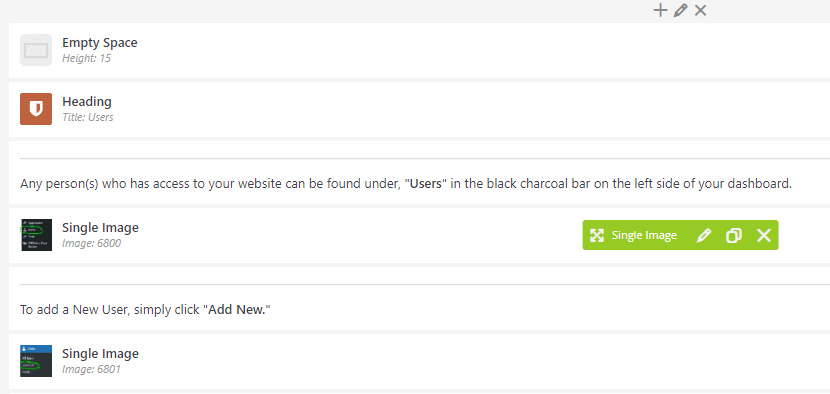
You can see a preview of the image in the window. Click the red X to remove it. Click the green + to add a new one from the media library.
You can change the size of the image in the Image size box. You can also use the shortcuts “thumbnail”, “medium”, “large”, and “full”. Simply type the word into the Image size box.
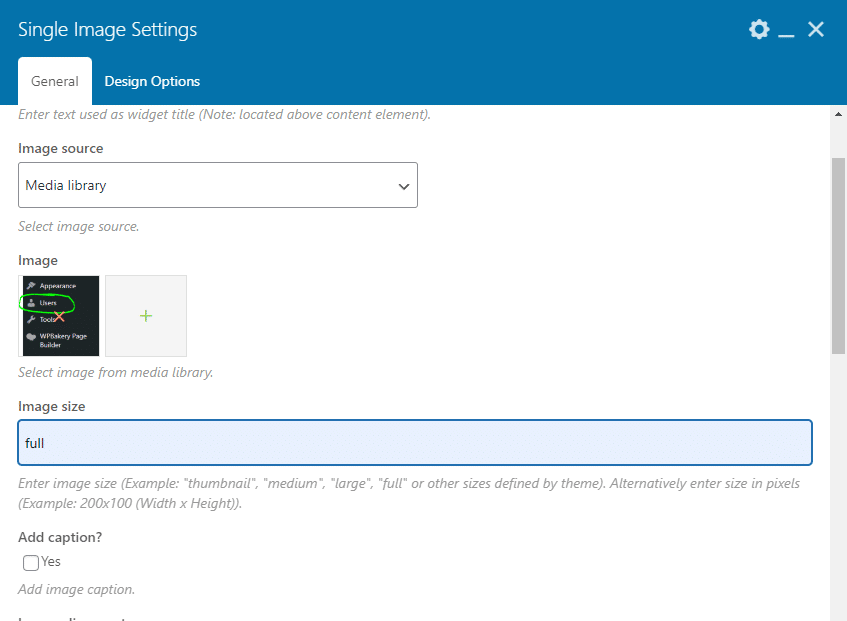
🛈 You also might find it useful to turn your image into a button. To add a link, go to the On click action dropdown and select the Open custom link option. You can then add any url link you like.
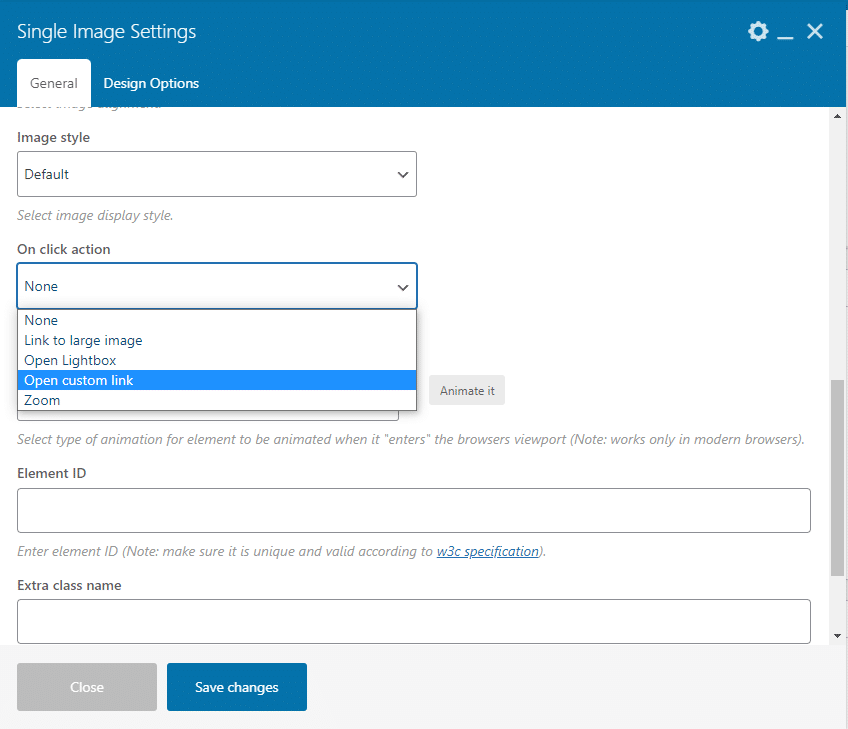
Editing Background Image
You can add either an image or video to the background of a row.

Click the Pencil Icon in the row you want to edit.

Click the 907 Options tab. From there you can either delete, change, or add a background image from your media library. Click Save Changes to finish and then the Update button to publish your changes.

🛈 You can also set a video as a background. Selected Hosted Video from the dropdown menu.

Editing Buttons
You can customize buttons in several ways, including the destination, color, and hover color.

Find the row with the button you would like to change and click the pencil icon.

In the General tab, you can change the Button Text as well as the URL.

Scroll down for Background Color, Font Color, and Border Color options.

In the Hover tab, you can change the Font Color, Background Color, and Border Color when a cursor hovers over the button.

Creating Anchors
Anchors allow you to link to a certain row/section on your website.
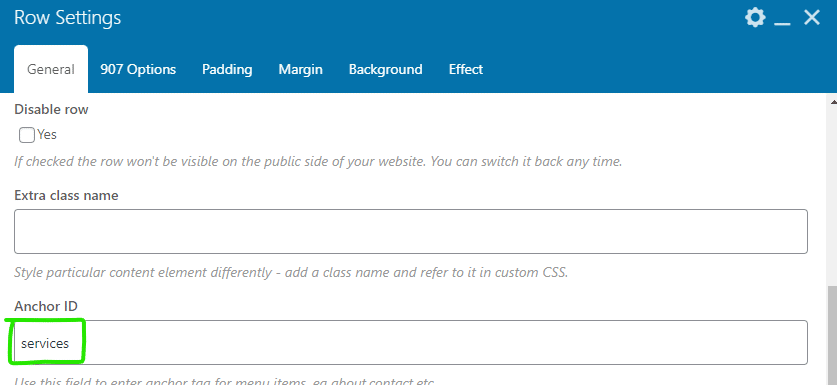
Find the row you would like to anchor to and click the pencil icon.

In the General tab, scroll down to Anchor ID. Give your section a unique name. Click Save Changes.
🛈 Do not use spaces, special characters, or capital letters
Find the element you want to add the link to. In this case, we are using a button.
Click the pencil icon on the content block and scroll down to Button Link. Click Select URL.
Type a # (pound sign/hashtag) followed by the Anchor ID. Click Save Changes.
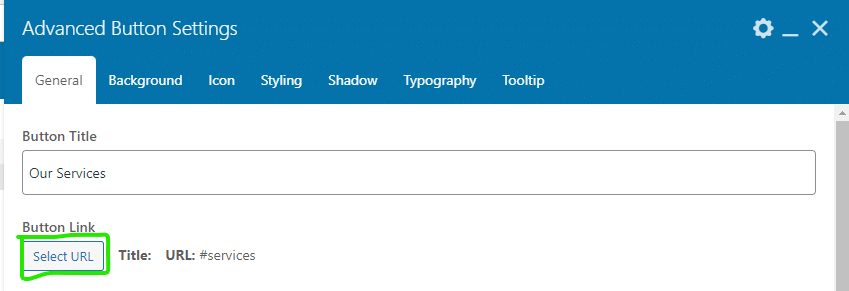
🛈 You can also link to an anchor on another page. Instead of using just the Anchor ID, type the URL of the page followed by the Anchor ID.
For Example: thegratzi.com/wordpress-training#contentblocks. The link will first take you to that page, then scroll to the Anchor ID you selected.
Editing Accordions
Accordions allow you to organize information in a compact space. The content of an accordion is a simple text box.
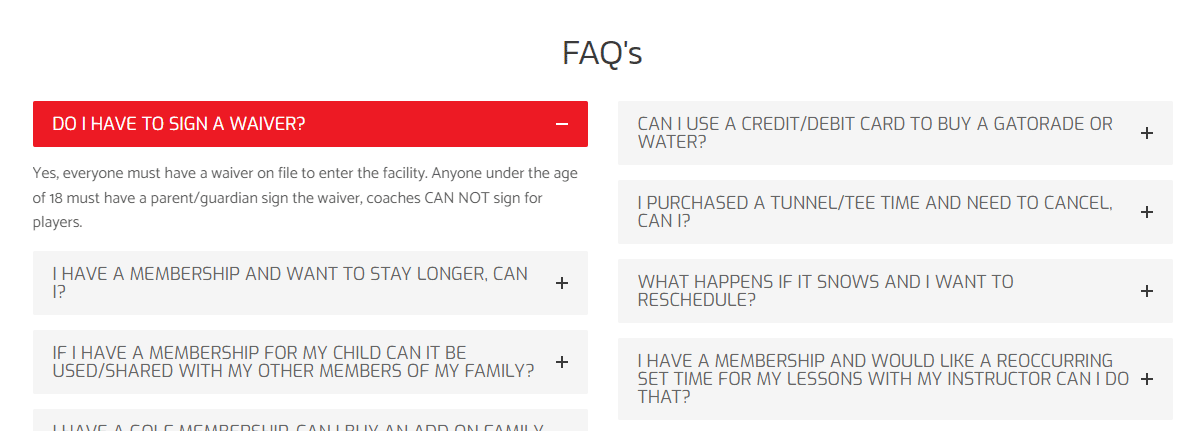
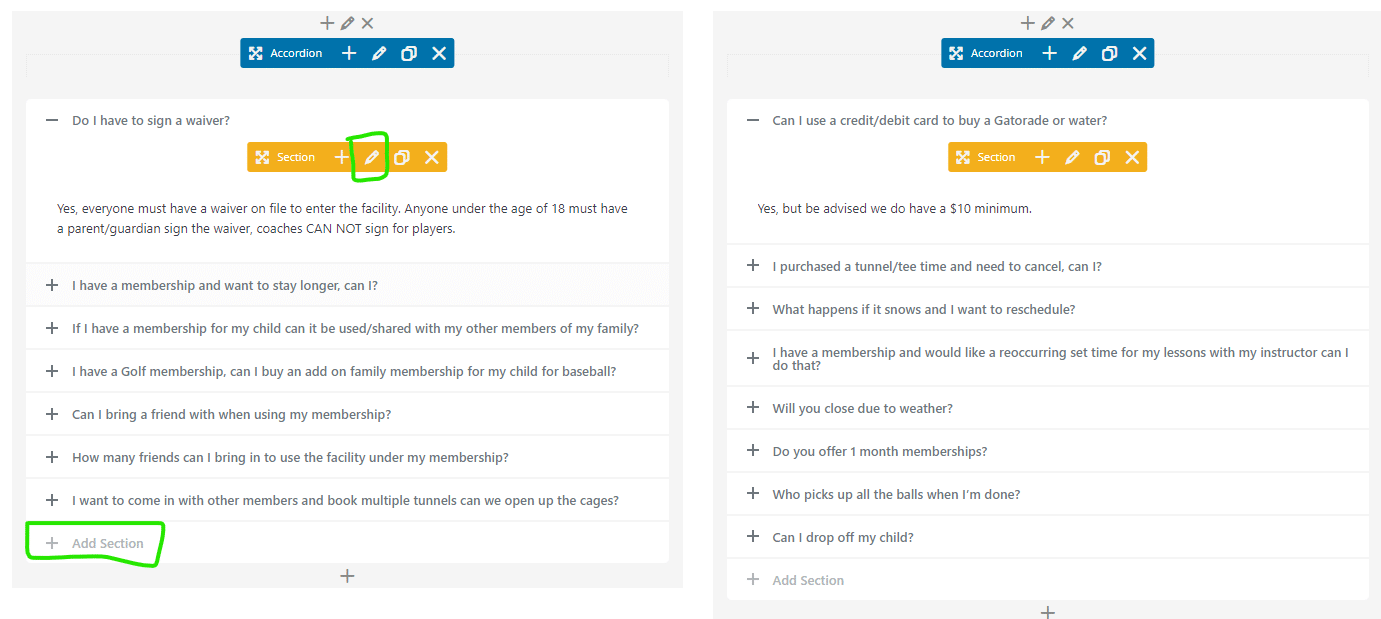
Find the row with the Accordion you would like to change and click the pencil icon to edit the title of the section. You can also add a new section by clicking Add Section.
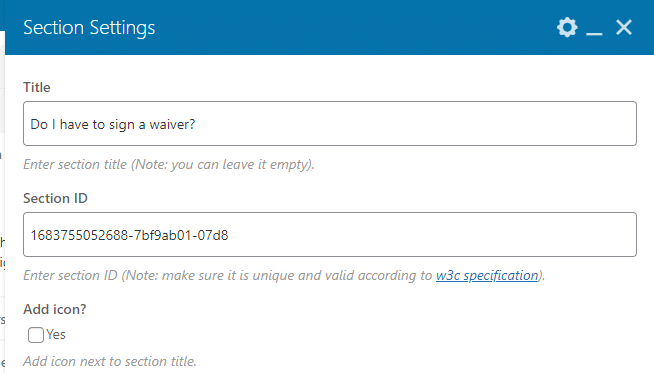
Change the section title under Title. Click Save Changes.
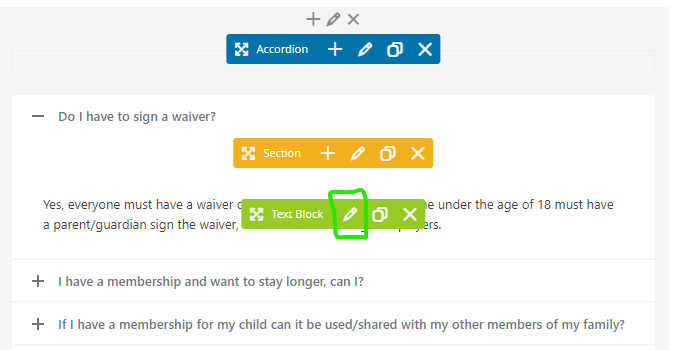
Hover over the accordion text and select the green pencil icon. From there, you can edit the text box. Click Save Changes and Update the page to publish your changes.
Editing Advanced Slider
An Advanced Slider showcases different images and text on your home page. The settings are at the bottom of its page in the WordPress backend.
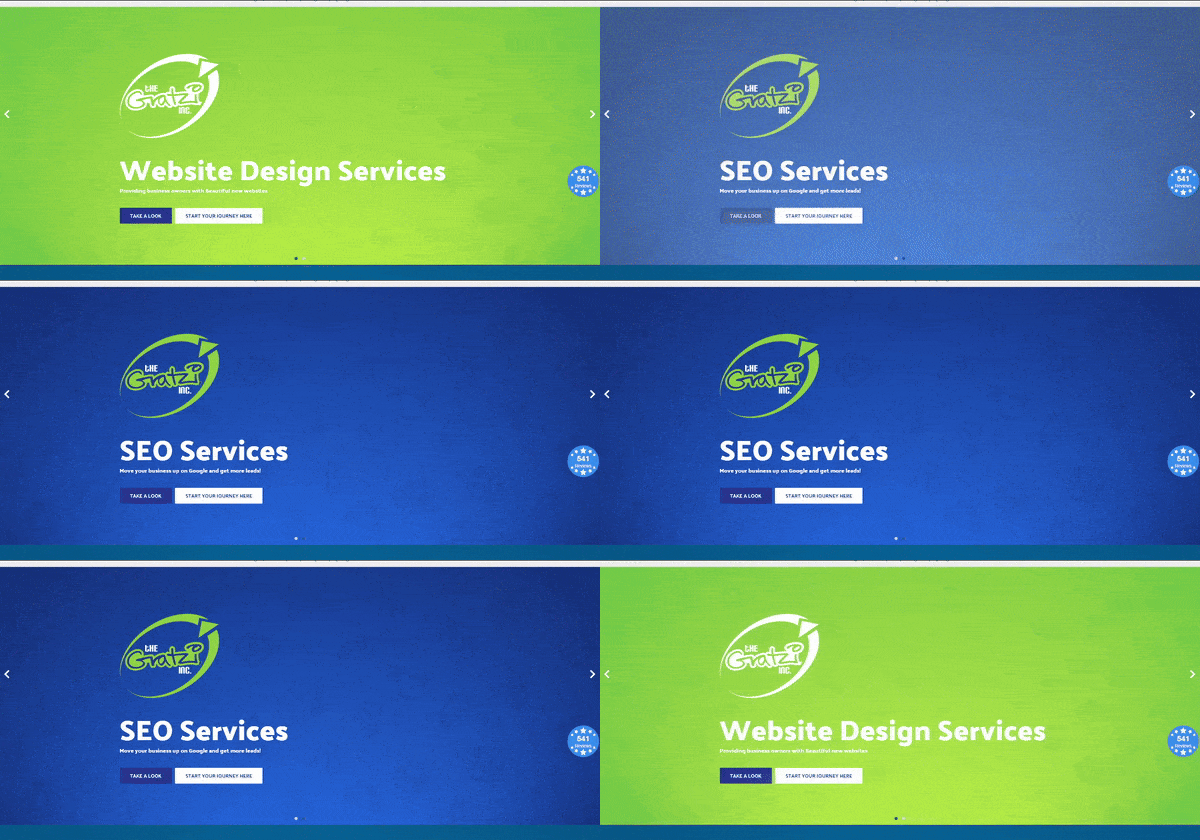
Advanced Slider has a Content Block within a Row. This is just a visual representation of where it will be on the page.

Scroll down near the bottom of the page to find the Advanced Slider section. From here, you can change text, images, and backgrounds for each slide.
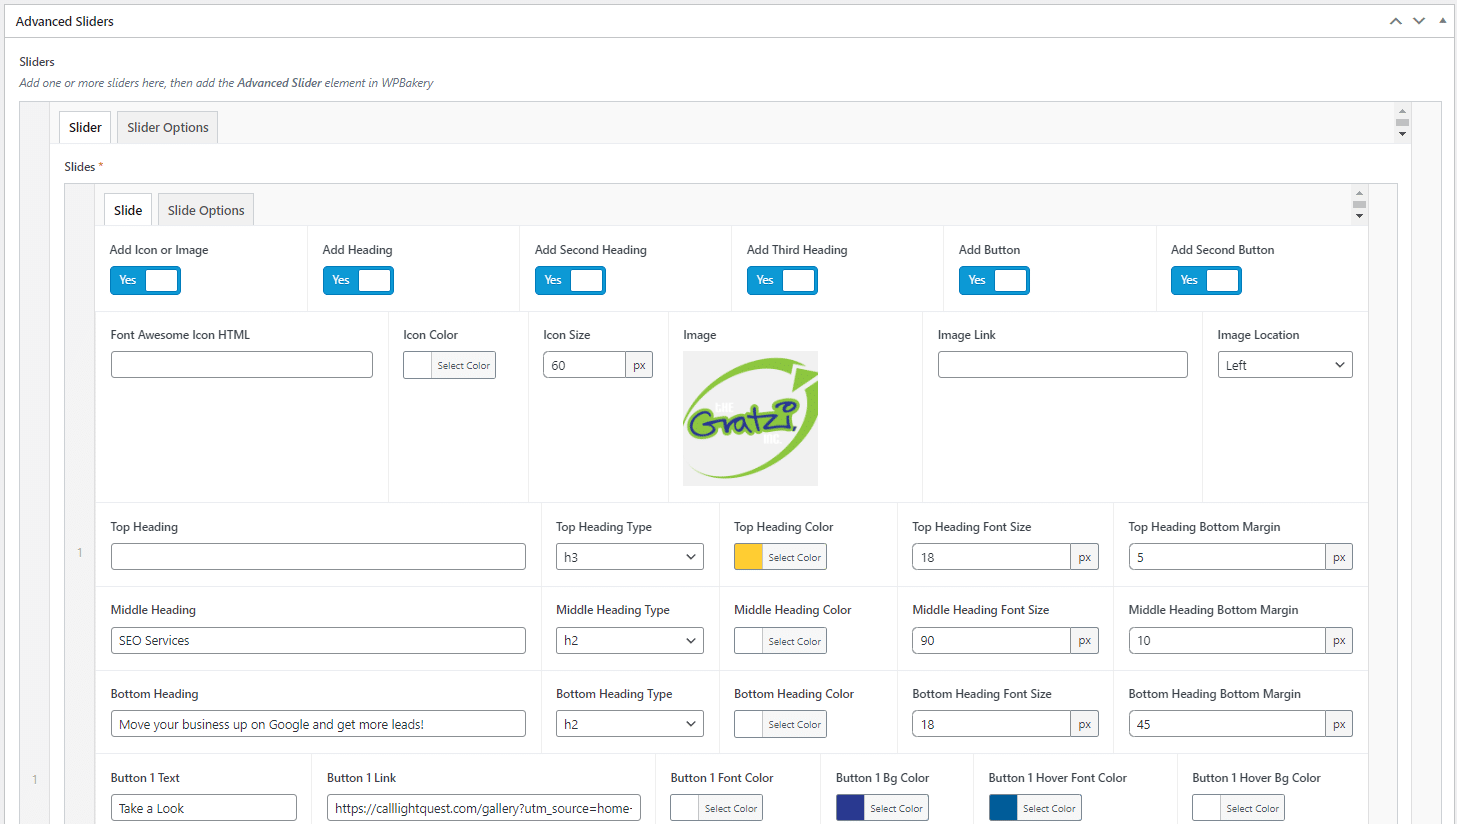
In the Slider tab, you can view the current slides and make changes. In the Slider Options tab, you can change options for Autoplay, Interval, and Navigation Arrows.
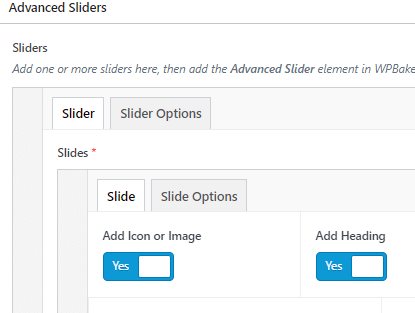
The Slide tab lets you edit the content on each slide. When you toggle the options on top, the settings appear in the section below it. In each section (Button, Heading, etc.) you can edit things like colors and size.
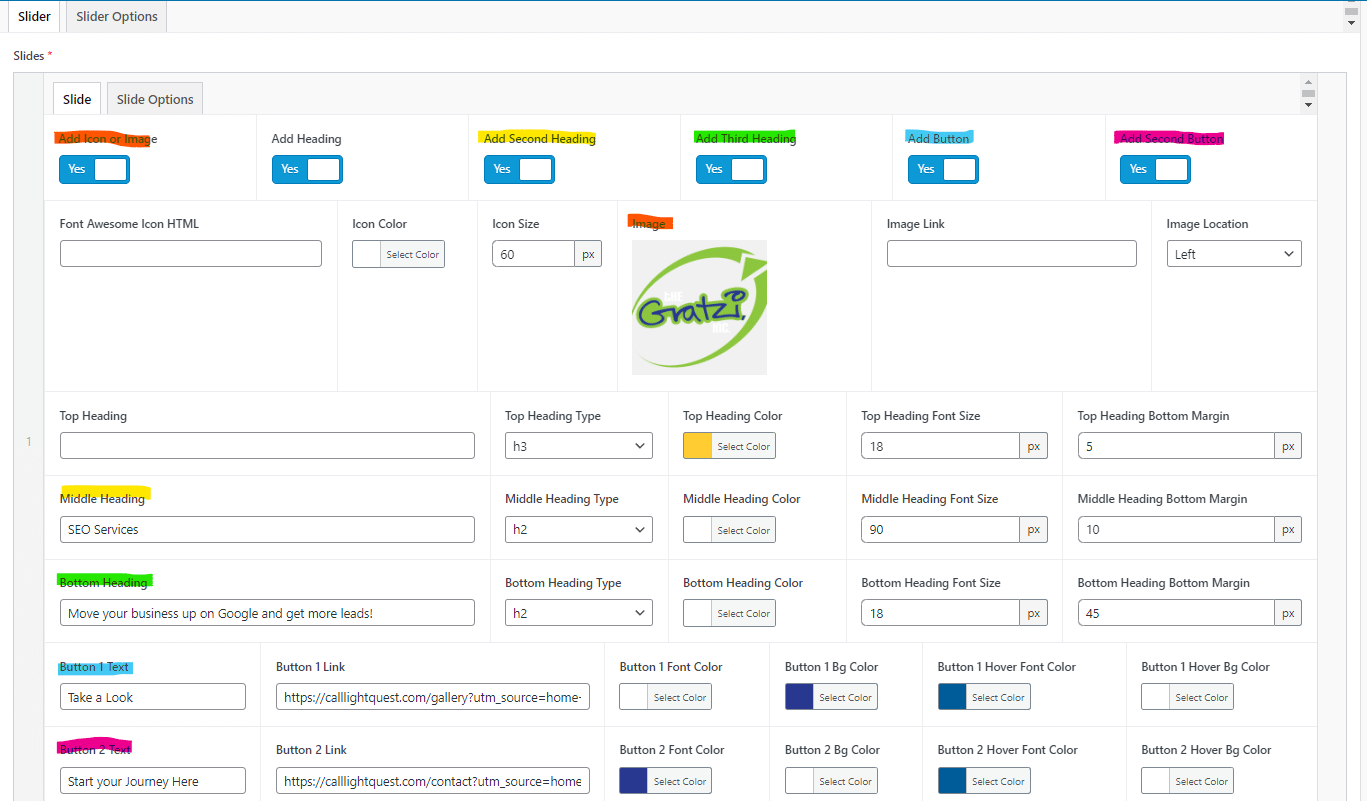
The Slide Options tab lets you edit the background image or color of each slide. You can also edit where the text is placed within it (Left, Center, Right).

If you want to add or delete a slide, hover over the slide you want to edit, and click the + or – icon to the right.
🛈 You can also copy slides, see below

Copy slides by clicking the slide you want. Then hover over it, hold the Shift Key and click the copy icon on the right.

Editing Advanced Image Gallery
An Advanced Image Gallery makes it easy to organize galleries for multiple pages. The settings for each Advanced Image Gallery is at the bottom of its page in the WordPress backend.

Advanced Image Galleries have a Content Block within the Row. This is just a visual representation of where it will be on the page.

Scroll down near the bottom of the page to find the Advanced Image Gallery section. From here, you can add and remove images as well as add Category tags and Captions.
🛈 Category tags allow you to sort images using the Show Filters setting (below).

The Options tab allows you to customize your gallery as well as turn on the Filters setting.

Creating Multiple Advanced Image Galleries
Start by copying an Advanced Image Gallery Content Block. Then hover over the new content block and click the pencil icon. Select Gallery 2 (or 3, etc.).
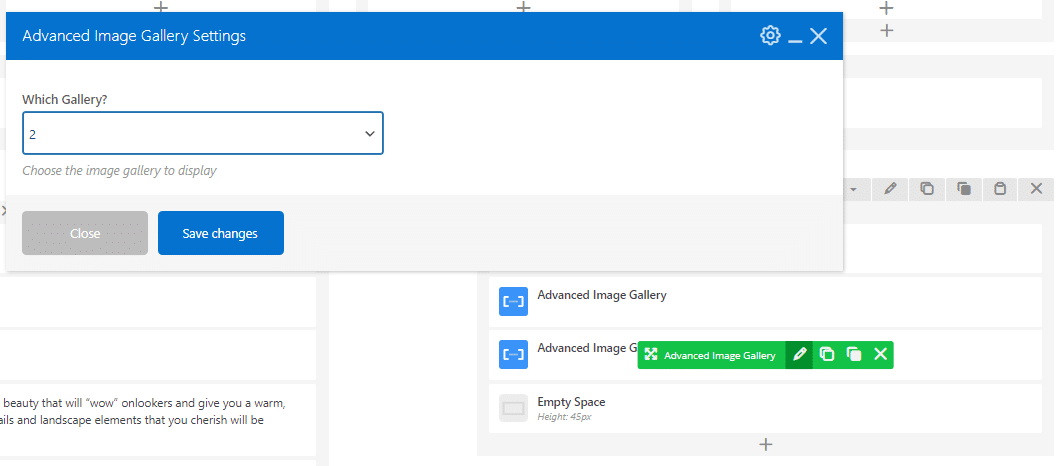
Scroll down near the bottom of the page to find the Advanced Image Gallery section. Click Add Gallery.
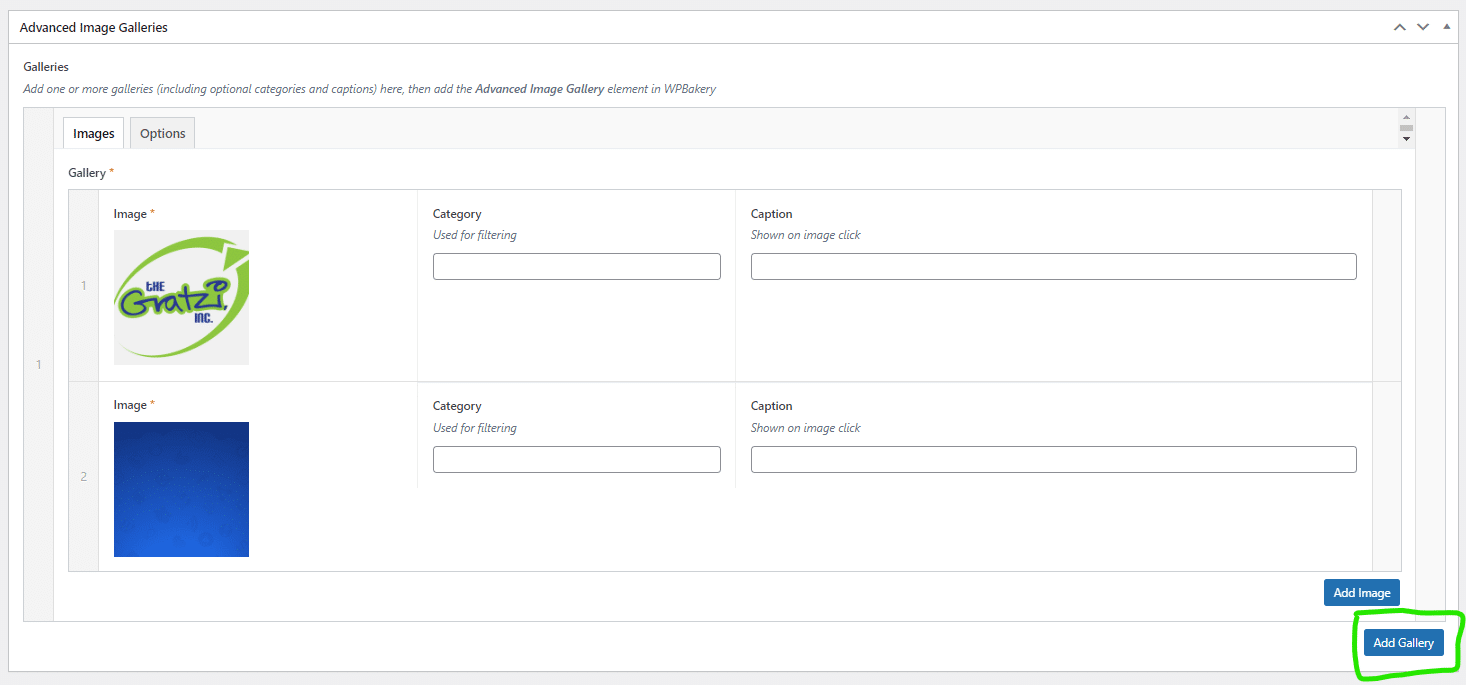
A new gallery will appear below. From here, you can add your content.
🛈 You can use the same process for Advanced Image Carousels and Advanced Video Galleries.

Editing Advanced Image Carousel
An Advanced Image Carousel allows you to create and customize a scrolling gallery of images.

Advanced Image Carousels have a Content Block within the Row. This is just a visual representation of where it will be on the page.

Scroll down near the bottom of the page to find the Advanced Image Carousel section. From here, you can add and remove images as well as add Captions.

Here you can customize your carousel with features like Autoplay and Navigation arrows.

Editing Advanced Video Gallery
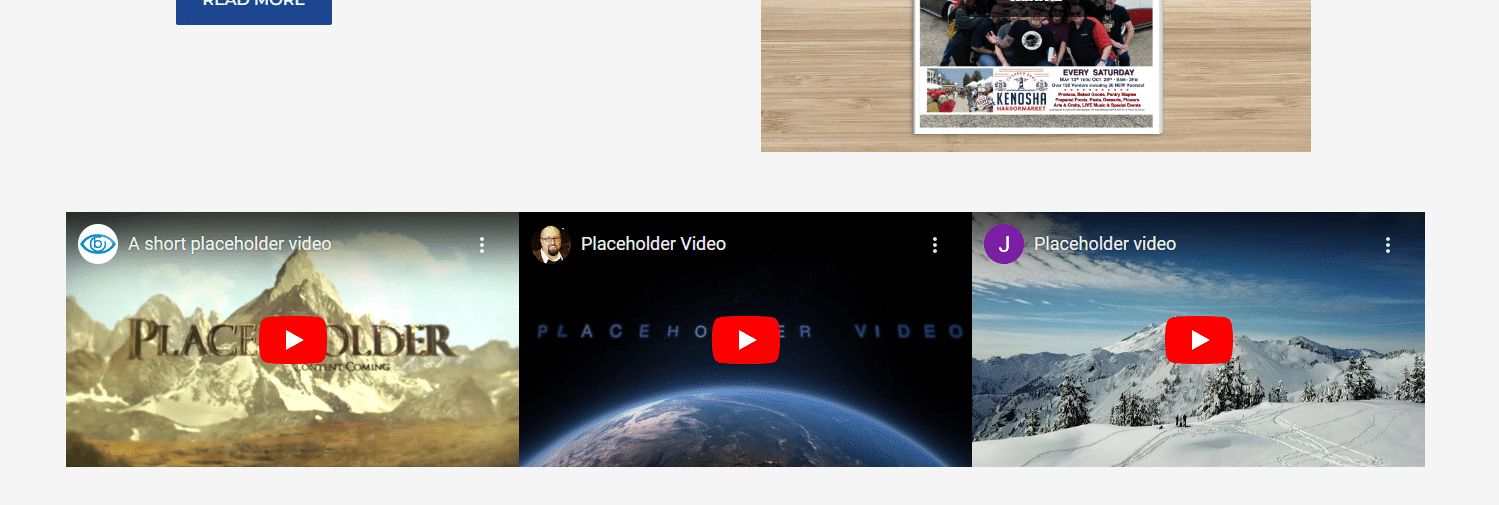
An Advanced Video Gallery allows you to create and customize a scrolling gallery of videos. It functions the same as the Advanced Image Galley.
Editing an Embedded Video

Advanced Image Carousels have a Content Block within the Row. This is just a visual representation of where it will be on the page.

Scroll down near the bottom of the page to find the Advanced Image Carousel section. From here, you can add and remove images as well as add Captions.

Here you can customize your carousel with features like Autoplay and Navigation arrows.

ADVANCED CUSTOM FIELDS
Advanced Custom Field (ACF)
Advanced Custom Fields offer an easy way to format content. When you enter your content in an ACF, the information is automatically formatted and stylized. If your website development includes an ACF, it will be in the left hand menu. In this example, “Careers” is an ACF, but they can also be things like Menu, Team Members, Locations, etc.
Find your ACF in the sidebar menu. (Careers in this example)
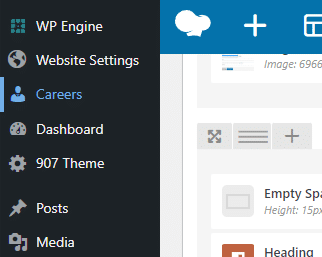
Click the Add Item button (Job Listings in this example)

Fill in the form and click Update

Your Information will be automatically formatted and stylized on the page.

🛈 ACF’s are commonly used for client reviews on your website. You can find Client Reviews in the sidebar menu or under Theme Features.

FORMS
Forms
You can see all the forms on your website by navigating to Forms on the left side menu.
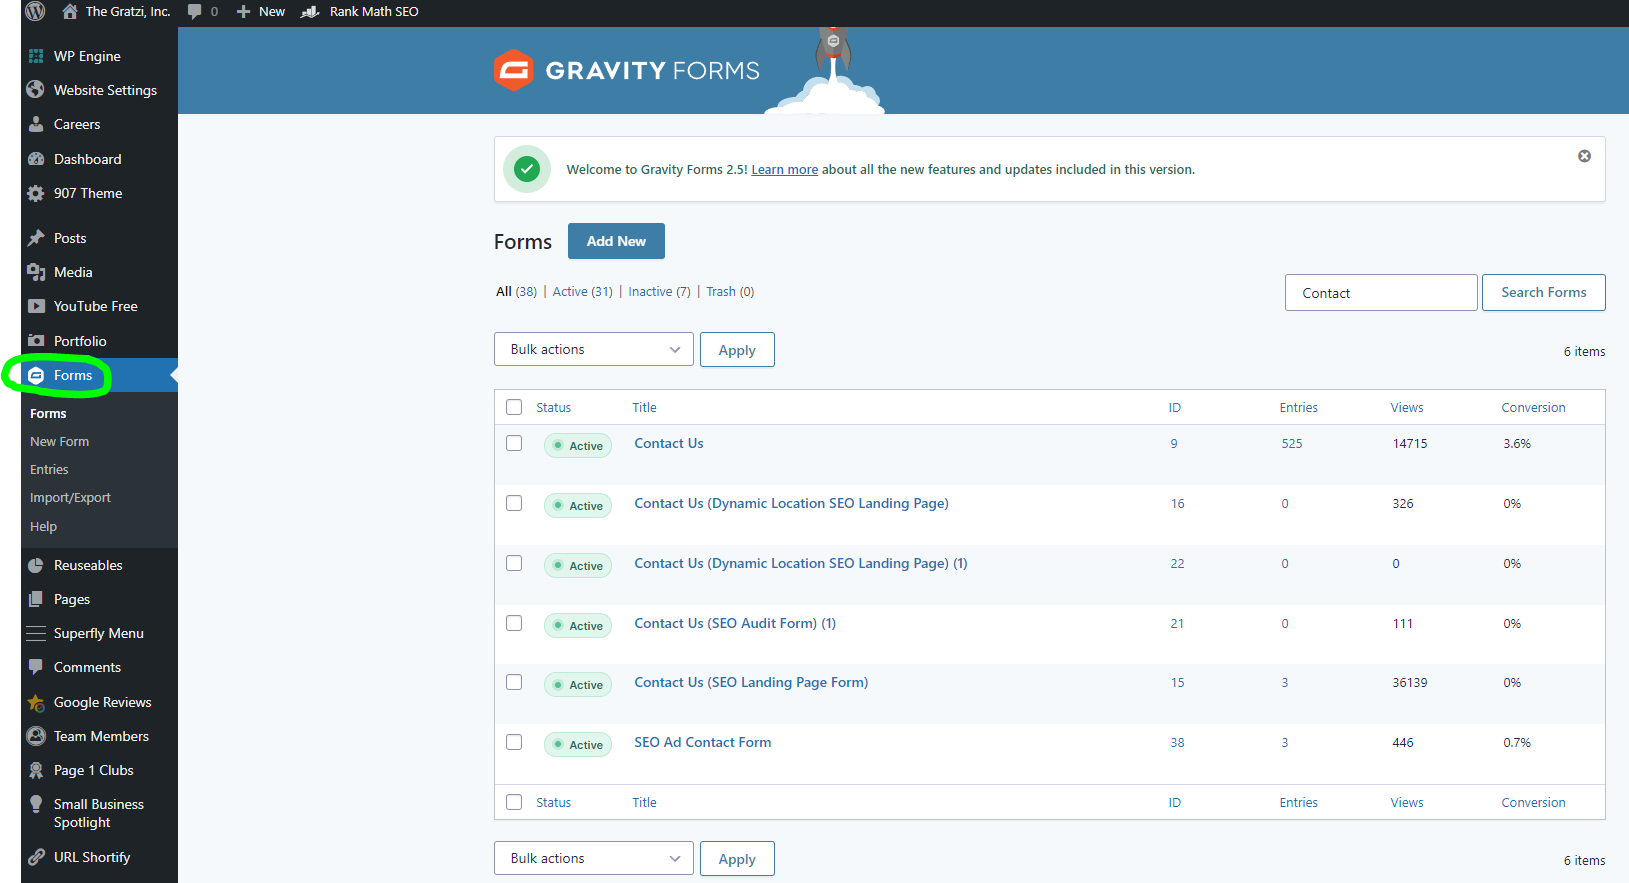
Hover over any form title to Edit, review Entries, or adjust the form’s Settings.

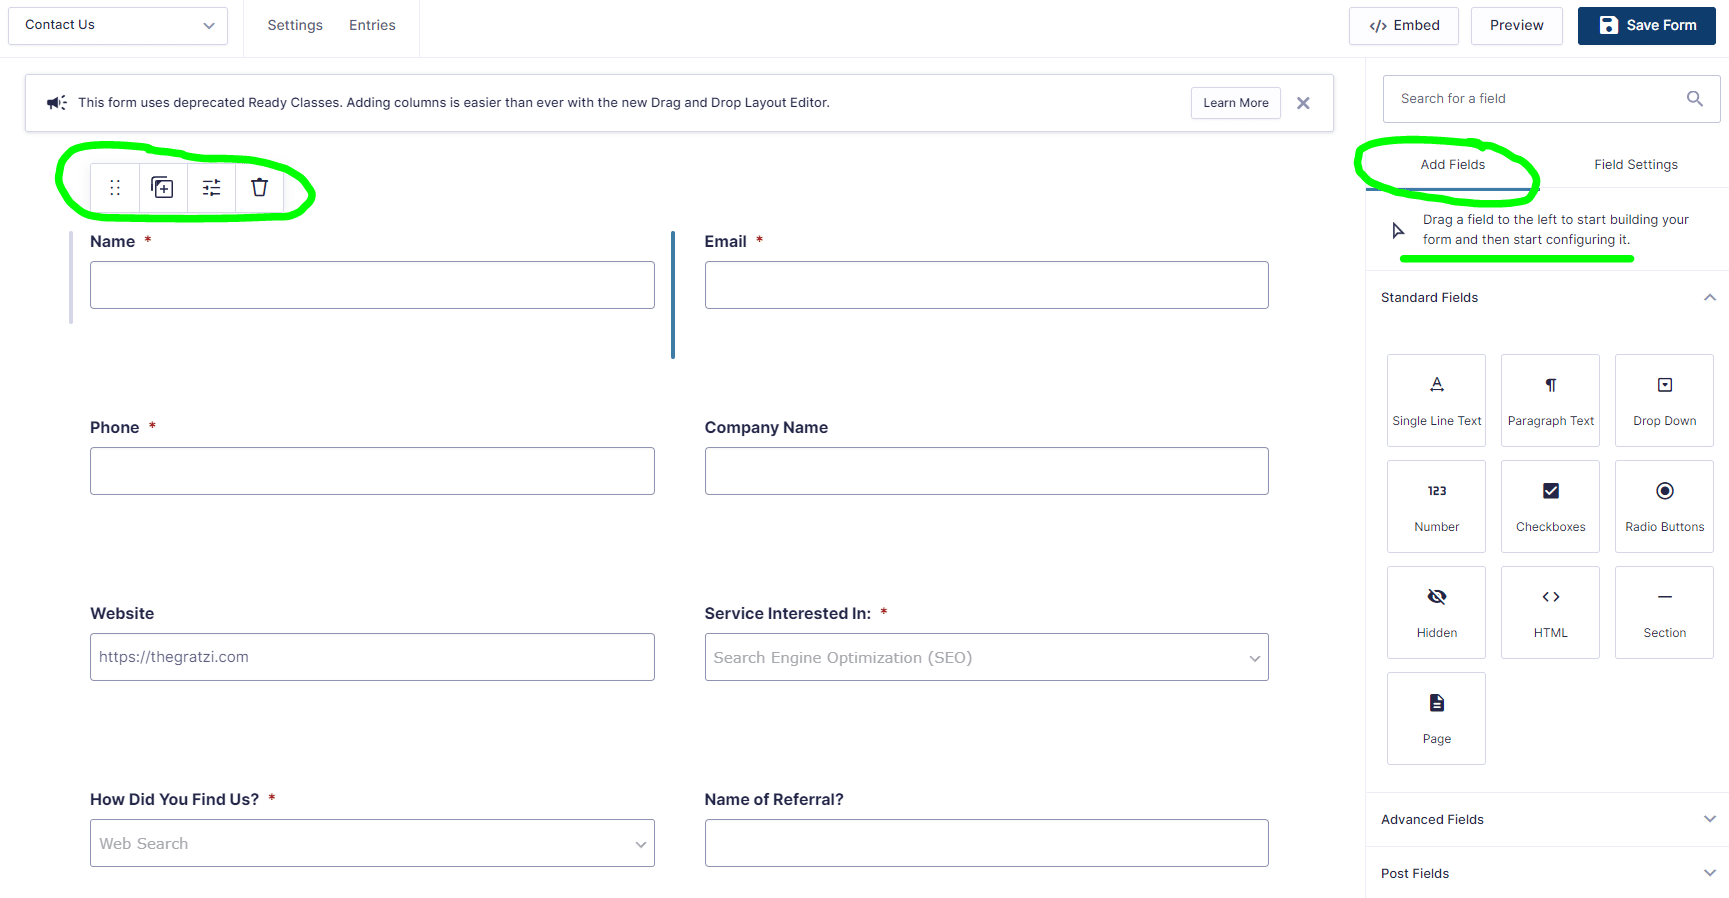
To edit a form, click on a current field and adjust the settings on the right. Make sure to click, Save Form when you are happy with the changes. You can also Preview the form, first.
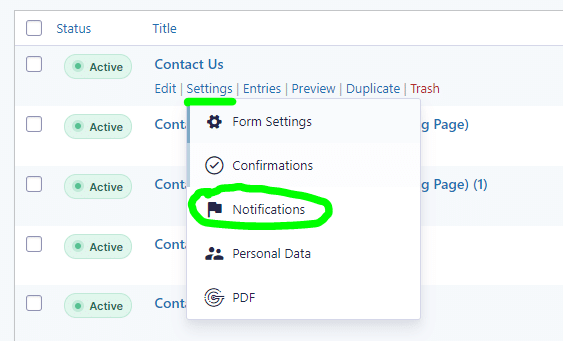
To edit where the form is SENT (what email address will receive the contact form submissions), go to Settings → Notifications.
To view form submissions, click on Entries.

Reusables
Using Reusables On Your Website
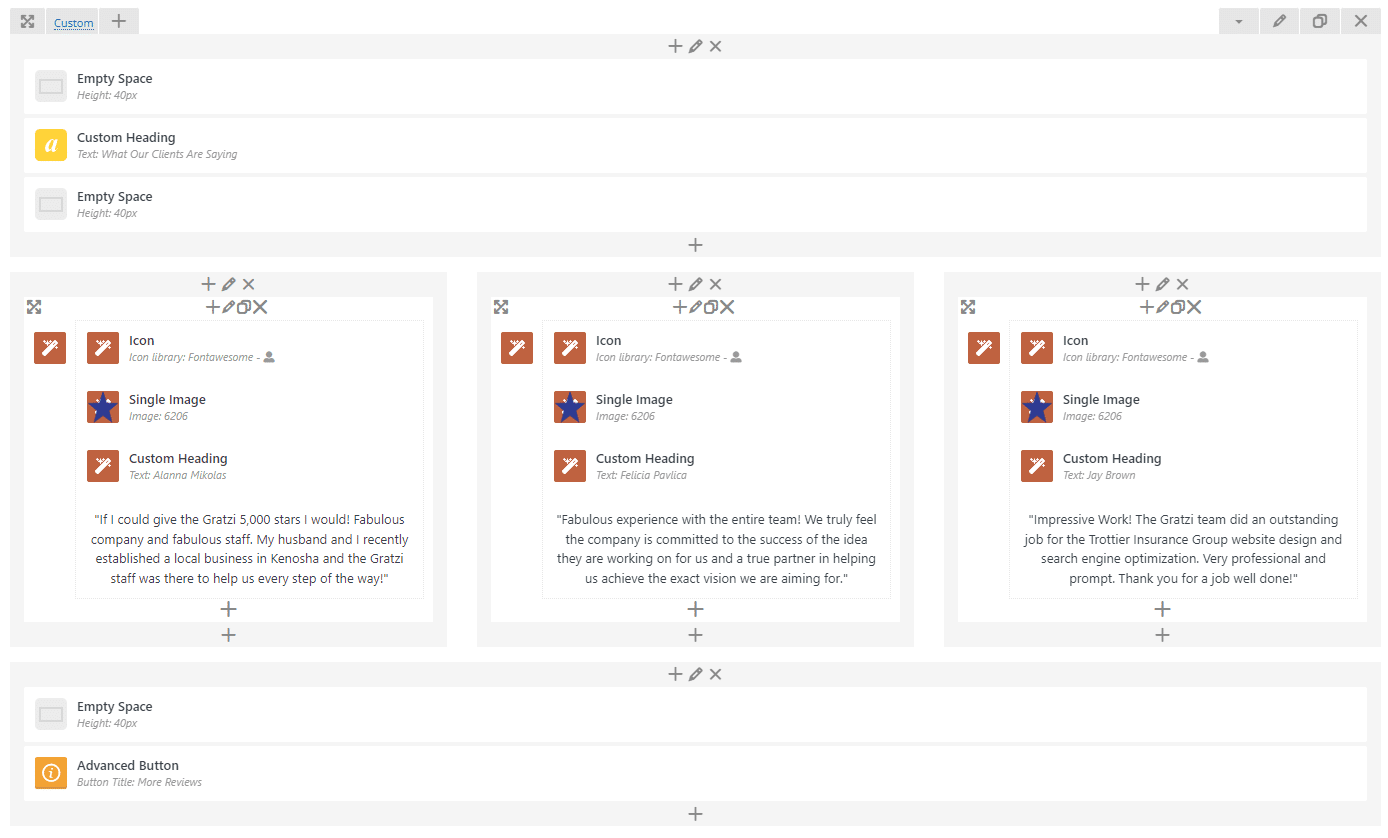
You can turn any individual or group of blocks into reusable blocks. For example, let’s say you have a Paragraph block and button that you often place at the end of your pages. To avoid remaking the same content each time, you can make this content into a reusable block.
Creating a Reusable
In the charcoal sidebar menu, hover over Reusables and click on Add New.
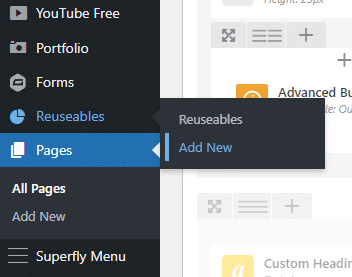
Use Rows, Columns, and Content Blocks to create your design.
🛈 Be sure to Publish/Update your reusable after finishing.
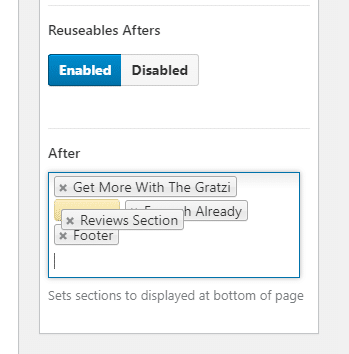
Navigate to the page you want the Reusable on. On the left side menu, scroll down to the Reusables section. Set Reusables to Enabled.
If you want your Reusable at the top of the page, enable Reusables Before. If you want them on the bottom of your page, select Reusables After.
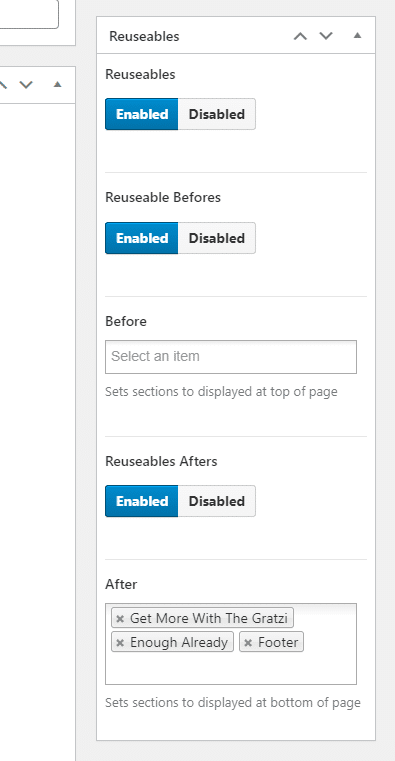
🛈 In this example, we are adding a reusable to the bottom of this page.
Click into the text box under the section you are adding to (Before or After). A list of your reusables will appear. Click the one you want to add.
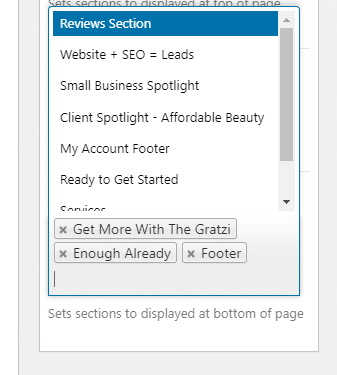
The order the gray tiles are in is the order they will be on your page. Click and drag the tiles to the order you want.
When you are done, be sure to update your page by clicking the Update button near the top.
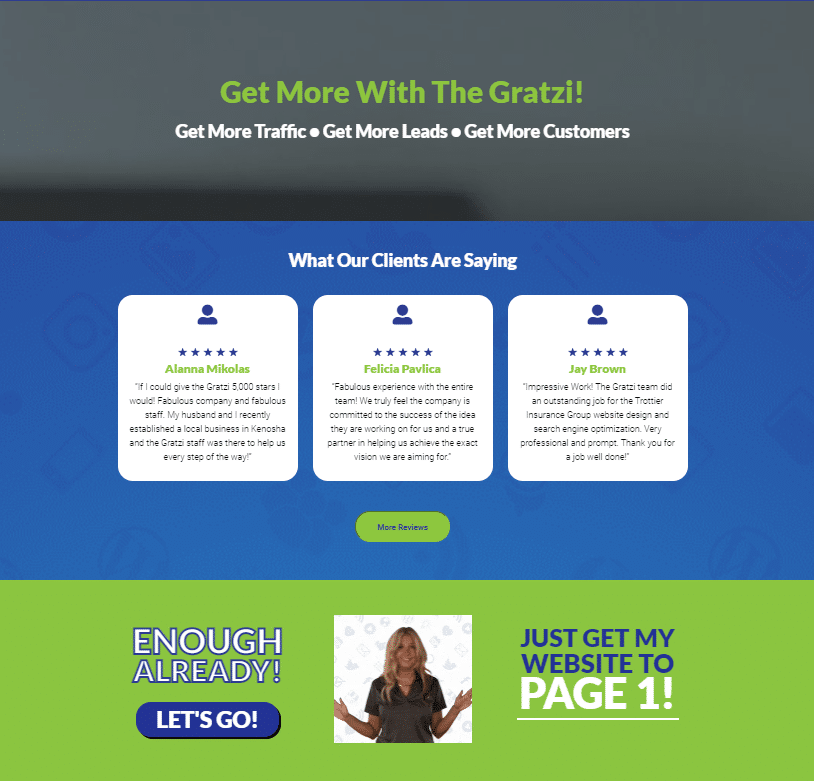
🛈 Here is what the reusables look like on the website.
Event Calendar
Adding New Events
Calendar events have lots of different options to choose from. You can even make events automatically repeat and set an end date.
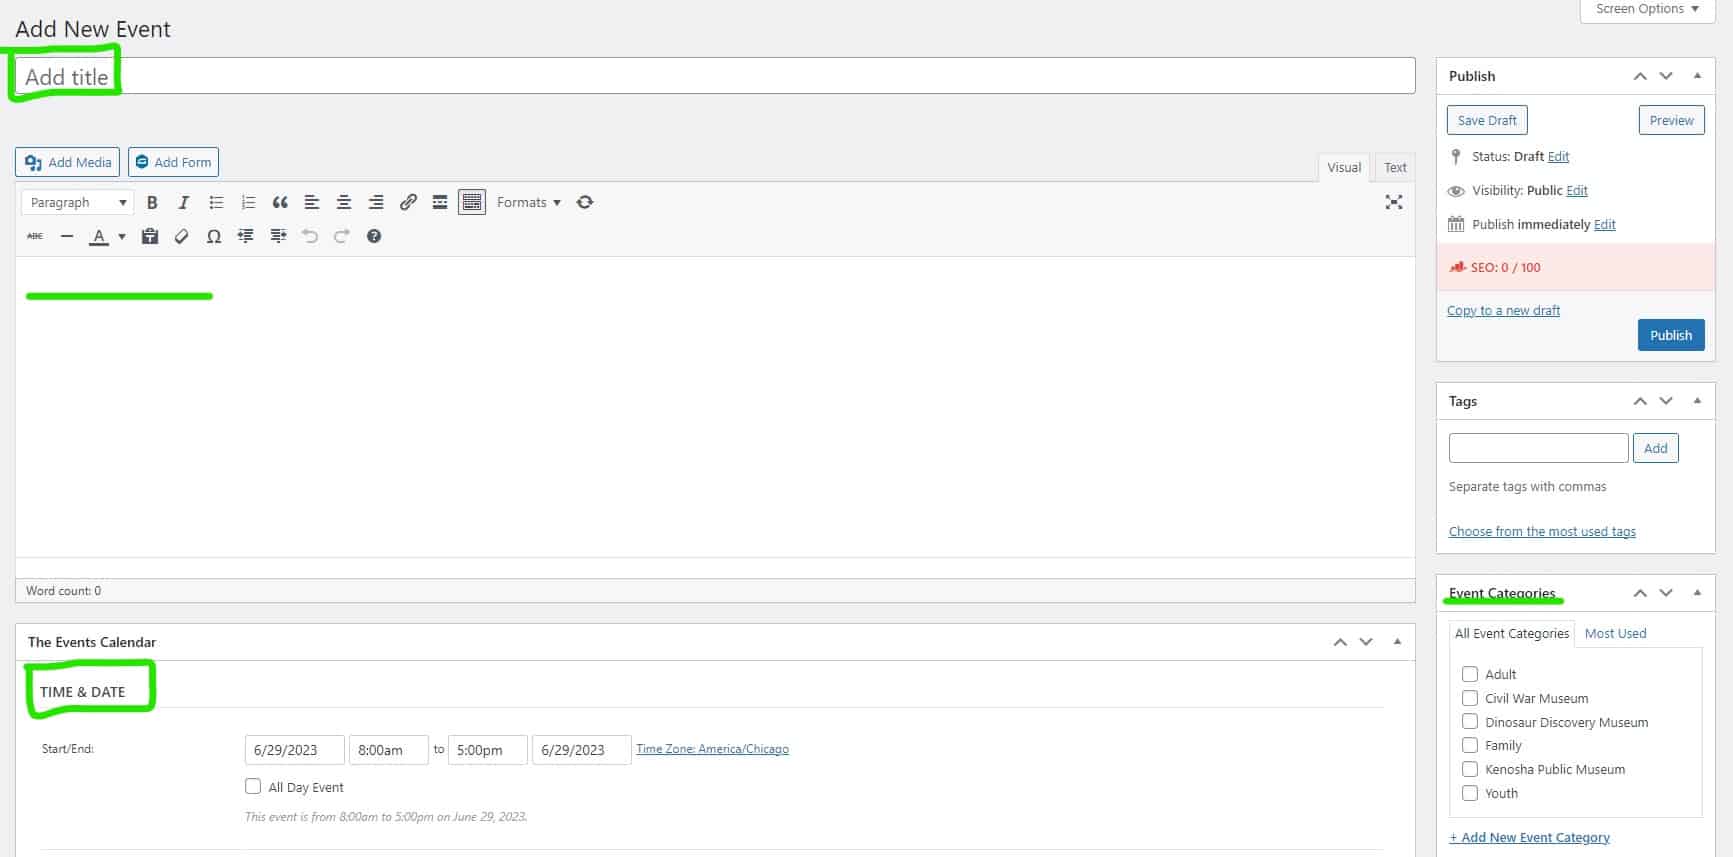
In the Charcoal Sidebar, hover over Events and select Add New.

On this page, you can add the event name, description, and time/date. You can also select/create an event category to sort your events.
🛈 You also have the option of making an event last all day. Just check the box for this option.
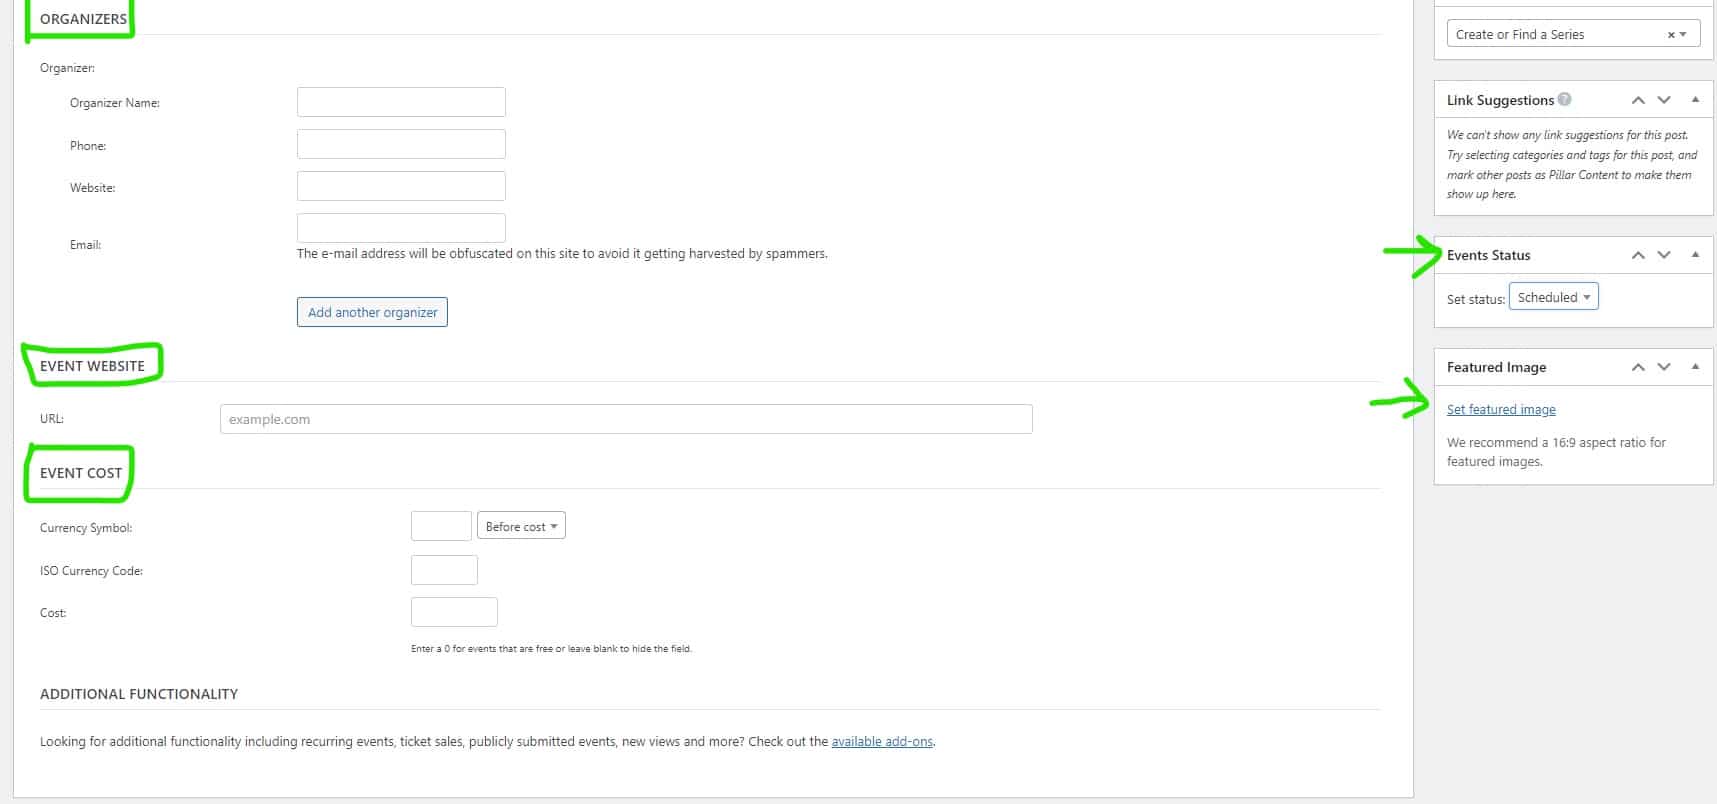
Scroll down to add an organizer, website link, cost, status, and featured image.
🛈 Depending on your website build, you might have even more options to choose from!
🛈 Events status is handy if you have to cancel or postpone an event.
The Recurring Event option is a powerful tool that can schedule duplicate events automatically.

There are several options to choose from. You can even have events repeat at intervals like “every third sunday”. Below is the option to add exceptions to the schedule.

Editing Events
In the Charcoal Sidebar, hover over Events and select Events.

Click on your event to open it. From there, you can edit the time/date, details, and change it’s status.
WooCommerce
WooCommerce
WooCommerce is a systems that controlls your website’s storefront.
Adding Variable Products
A Variable Product allows you to give customers different options for thier products. For example, a t-shirt that comes in different sizes and colors.
🛈 Here are some important terms to know
– Variable Product = Product with several options
– Attributes = What options there are available (Size, Color, Flavor etc)
– Variations = Possible combinations
In the Charcoal Sidebar, hover over Products and select Add New.

Add name, Category, Description (Product Short Description), and Main Product Image.
🛈 If you need a new category, there is an option to add a new category in the sidebar.

Change Product Type to Variable Product.

Add attribute from Attributes menu

Name the attribute (Size) and Values (Small, Medium, Large) use the Pipe Key to separate options. Be sure to check Used for Variations. Click Save Attributes.
Repeat the steps above for all attributes needed.

🛈 What is the Pipe Key? The Pipe shares a key with the backslash (\). See below.

Go to the Variations Menu and select Create variations from all attributes. Click Go.
All possible combinations will be created automatically.

🛈 Here is an example of what your variations will look like.

Select a variation to add an image, price, and shipping specs. A price is required to have it show on the product page. Be sure to save changes in this section when you are done.
Publish when finished.

🛈 You can add new attributes to an existing product. Just repeat these steps.
Product Import/Export
Importing and exporting your product data can make it easier to make mass edits.
Export
In the Charcoal Sidebar, hover over Products and select All Products.

Select Export.

Click Generate CSV.

Once your CSV file is downloaded, make a copy of it and save it somewhere safe. This is a backup in case you have any issues.
Then open your original file with a spreadsheet program like Excel or Google Sheets. From here you can make edits to any product info you like. Save your file when you are done.

Import
In the Charcoal Sidebar, hover over Products and select All Products.

Select Import.

Choose your edited file and click Continue.

Check that the Column Name on the left matches the Map to field on the right and click Run the Importer. All of your product data will be updated.
🛈 ALWAYS save the original export CSV. That way if there is a mistake, you can revert your changes by uploading the original CSV file.

Product Editing
In the Charcoal Sidebar, hover over Products and select All Products.

Click Edit under the items you want to edit.

From here, you can change the product name, Discription, Data, Short Description, Images, and Categories.
Product Description is the main product info. This shows on the items page.

Product Data is where you edit price and shipping.

Product Short Description is what shows on the shop page of your website before the customer clicks into the item listing.

Product Image is the main photo of your item.

Product Gallery are the other product photos you might have (colors, sizes)

Product Categories help you sort types of products in your storefront.
🛈 You can add new categories by clicking +Add new category

🛈 Be sure to Update your item to save!
Footer
Your Website Footer
The Footer is the information that lives on the bottom of your website. It contains important information like contact info, hours, and your mission statement.
Editing The Footer
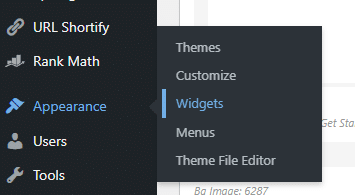
In the charcoal sidebar menu, hover over Appearance and click on Widgets.
🛈 Why is it called Widgets? Widgets are small apps that are used as shortcuts on your website. A collection of Widgets is what makes up your Footer.
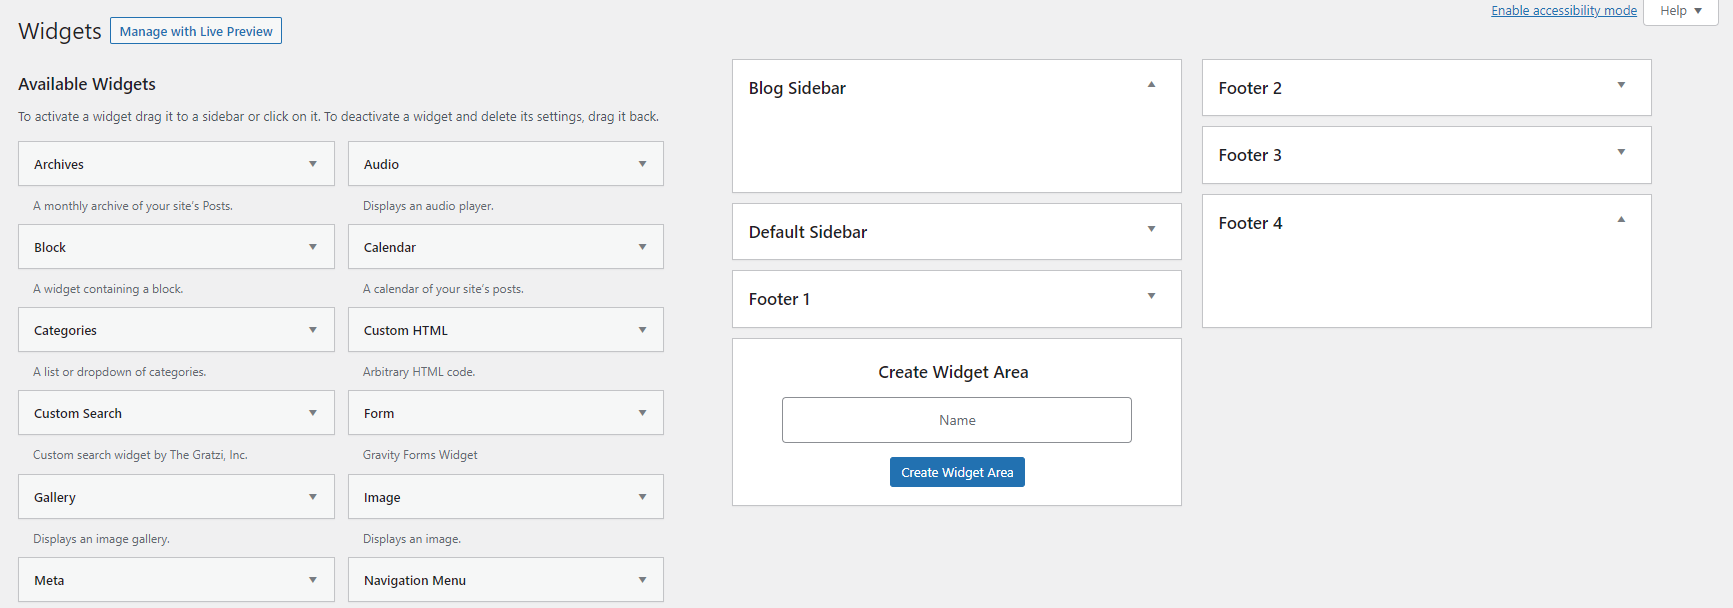
The gray tiles on the left are Widgets and the white blocks on the left is the structure that holds them (Footer).
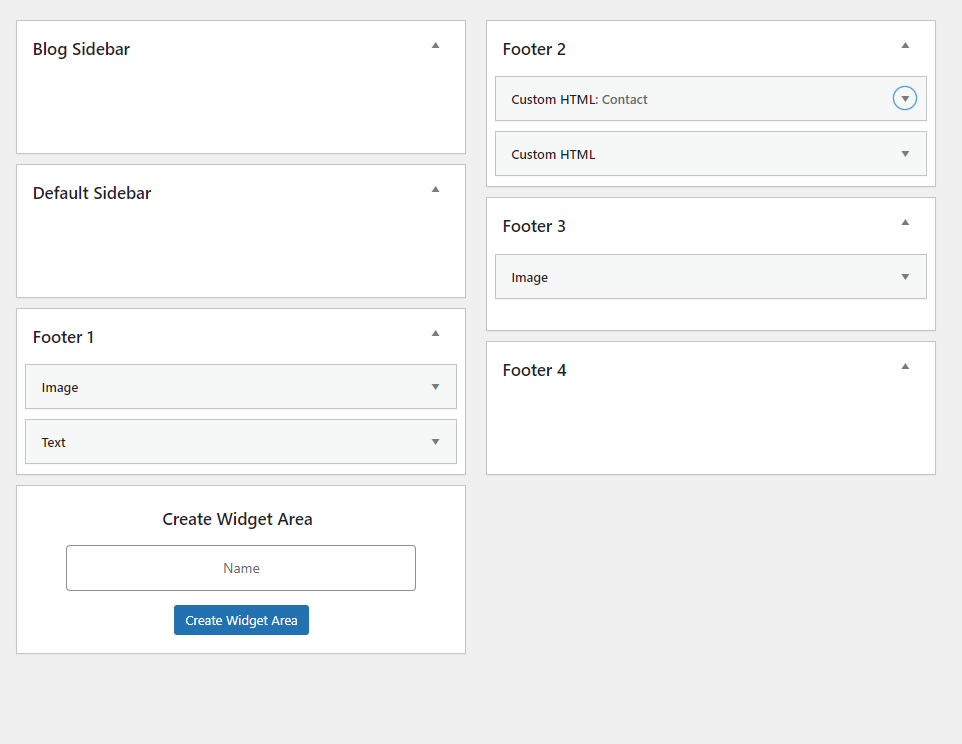
Swivel open the white blocks by clicking the gray triangle. Now you can see what kind of information lives in each section of the footer.
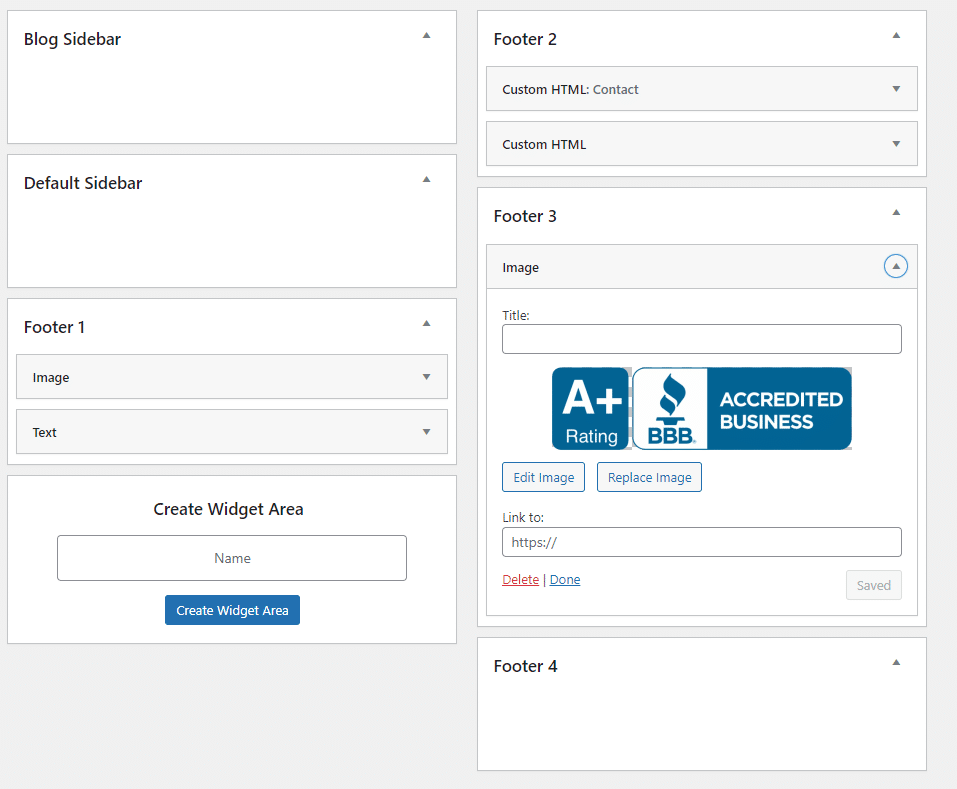
Swivel open the gray tiles blocks by clicking the gray triangle. This shows what content is in that section. From here, you can delete or change the content. When you are done making your edits, be sure to click Save in the section you are working in.
🛈 What is [Basic Site Info]? Where can I change my business information? Basic Site Info is a shortcut that pulls information from the Basic Site Info section of your website automatically. To change this information, follow the steps here.
Adding a Widget
In the charcoal sidebar menu, hover over Appearance and click on Widgets.

The gray tiles on the left are Widgets you can add to your Footer.

Swivel open the gray block you want to add by clicking the gray triangle. Select the location you would like to place it from the dropdown. Click Add Widget.
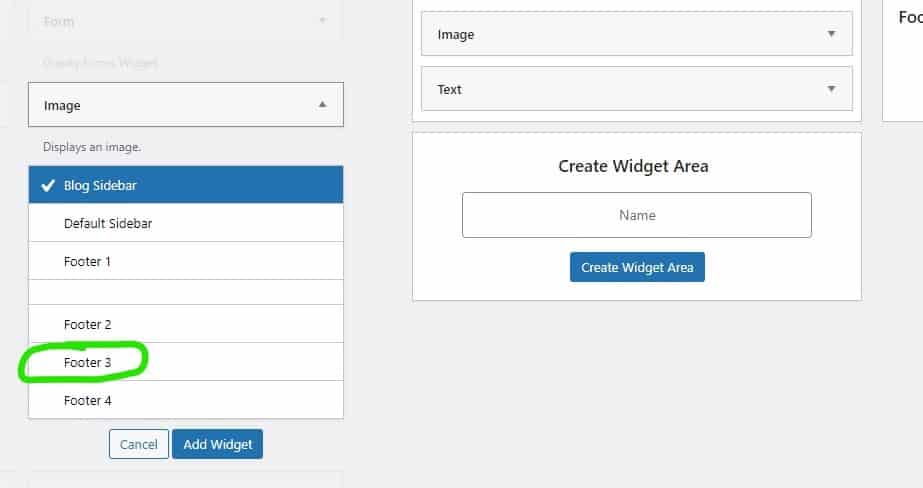
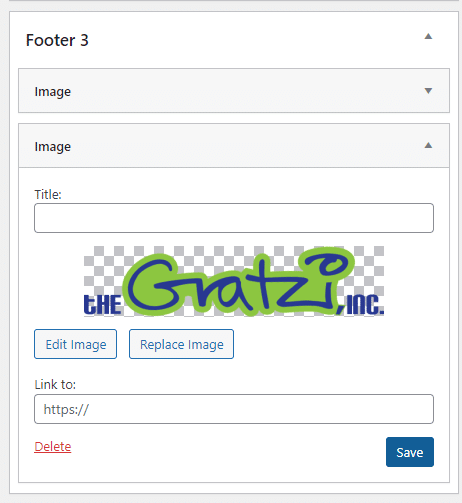
The Widget will now appear under the section you selected. You can then add your content. Click save to finish.
Social Media
Social Media Shortcodes
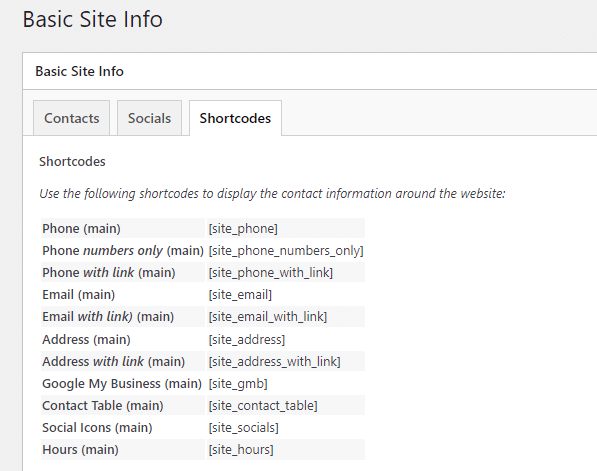
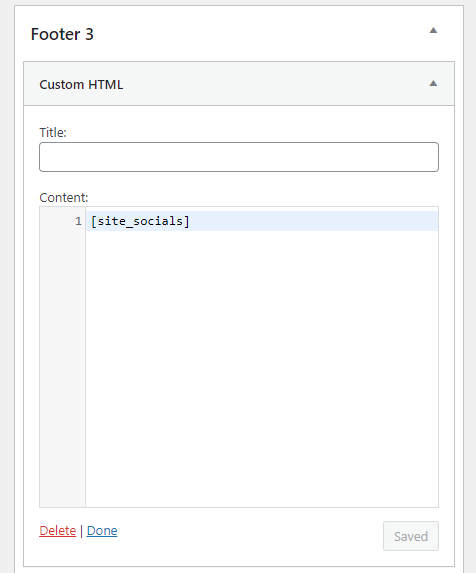
A Shortcode is a small piece of code that pulls information from another part of the website. In this case, we use the shortcode [site_socials]. This pulls the information from Basic Site Info and inserts it already formatted correctly.
Adding Social Media To The Footer
In the charcoal sidebar menu, hover over Website Settings and click on Basic Site Info.
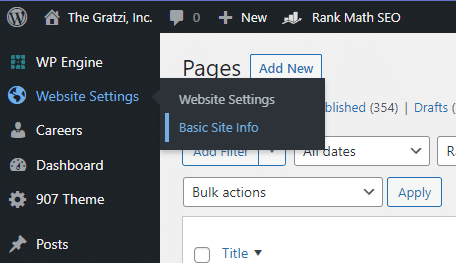
From here, you can view and edit your basic site info, including your Social media info in the Socials tab

Click on the Shortcodes tab to view the available shortcodes for your website. We’ll be using [site_socials]. Highlight and copy this text.
In the charcoal sidebar menu, hover over Appearance and click on Widgets.

The gray tiles on the left are Widgets you can add to your Footer.

Swivel open Custom HTML. Select the location you would like to place it from the dropdown. Click Add Widget.
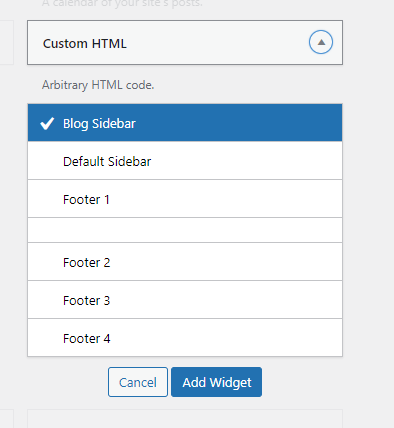
Paste your shortcode into the box, and click Save. Now your site’s social media info will be automatically inserted and formatted in your footer.
Adding Social Media To Pages Using HTML Content Block
Click the gray plus mark to add a content block to a row or column.
🛈 See Rows, Columns, & Content Blocks for more info.

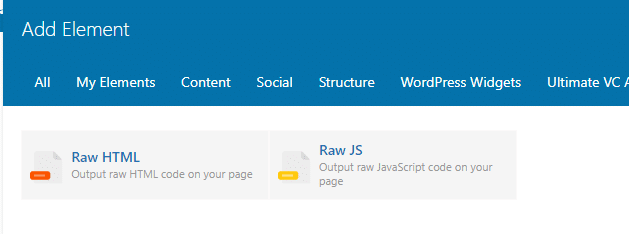
In the Add Element window, search for Raw HTML. Click it to add to your page.
Type in or paste the shortcode [site_socials] into this box. Click Save Changes.
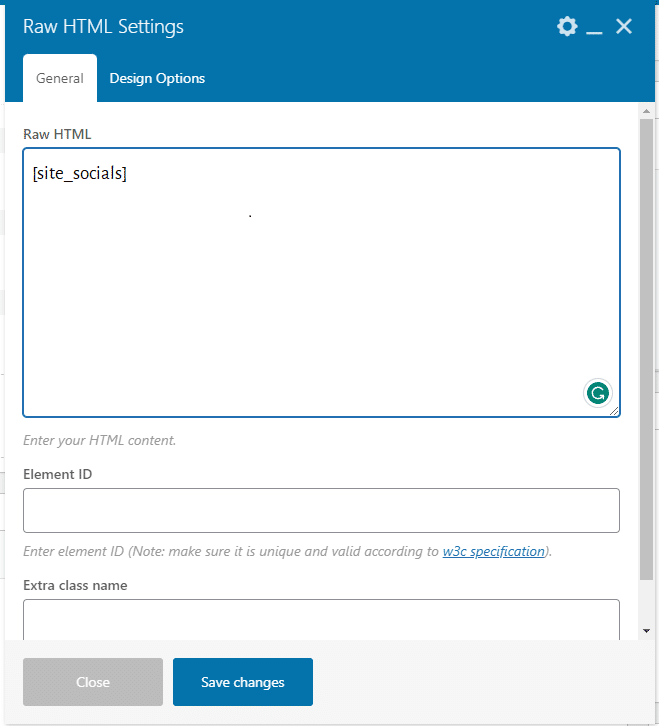
Click Update to save your page. Now your site’s social media info will be automatically inserted and formatted on your page.
Main Menu
Your Website Menu
The Main Menu bar is the way visitors navigate your website. It usually lives at the top of the screen but might be on the left or right depending on your design. It houses the main pages of your site, and can also be nested for better organization.
Editing The Main Menu
In the charcoal sidebar menu, hover over Appearance and click on Menus.

In the Select a menu to edit dropdown, select Main and click Select

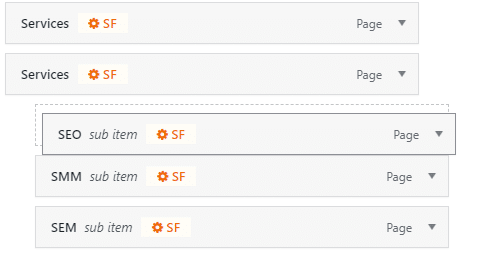
The gray tiles are the page links that are in your menu. You can drag and drop them to the position you want. When you’re done, click Save Menu near the bottom of the page.

🛈 You can also “nest” your page within another menu item. While dragging, move the tile slightly to the right. It will snap into place and nest under the tile above it
Adding A New Page To The Main Menu
In the charcoal sidebar menu, hover over Appearance and click on Menus.

In the Select a menu to edit dropdown, select Main and click Select

Find and select the page you want to add to the Main Menu. Then click Add To Menu.
🛈 You can view all pages or search by selecting the tabs near the top

Your selection will be at the bottom of the list of pages. Drag and drop the gray tile to the position you want. When you’re done, click Save Menu near the bottom of the page.

Adding An Anchored Row To The Main Menu
In the charcoal sidebar menu, hover over Appearance and click on Menus.

In the Select a menu to edit dropdown, select Main and click Select

Select Custom Links and type your Anchor ID into the URL box. Name your menu item in the Link Text Box. Click Add To Menu.
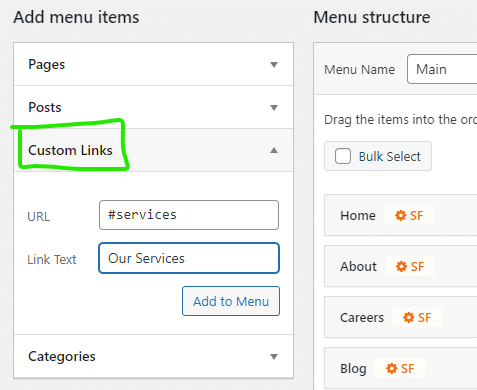
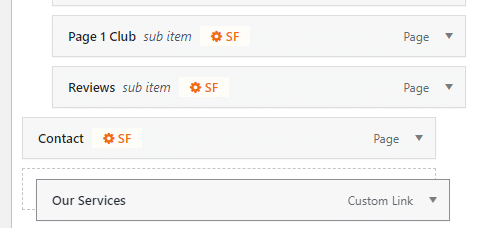
Your selection will be at the bottom of the list of pages. Drag and drop the gray tile to the position you want. When you’re done, click Save Menu near the bottom of the page.
Adding A Custom Link To The Main Menu
You can use the same process as above to add an external link to your menu. Instead of your Anchor ID, add the URL you want users to go to (booking website, online ordering, etc.). After creating your menu item, be sure to check Open Link In New Tab.

If you don’t see the Open Link In New Tab checkbox, click Screen Options at the top of the main window. Check the Link Target option and the Open Link In New Tab option will be enabled.

Deleting A Page From The Main Menu
In the charcoal sidebar menu, hover over Appearance and click on Menus.

In the Select a menu to edit dropdown, select Main and click Select

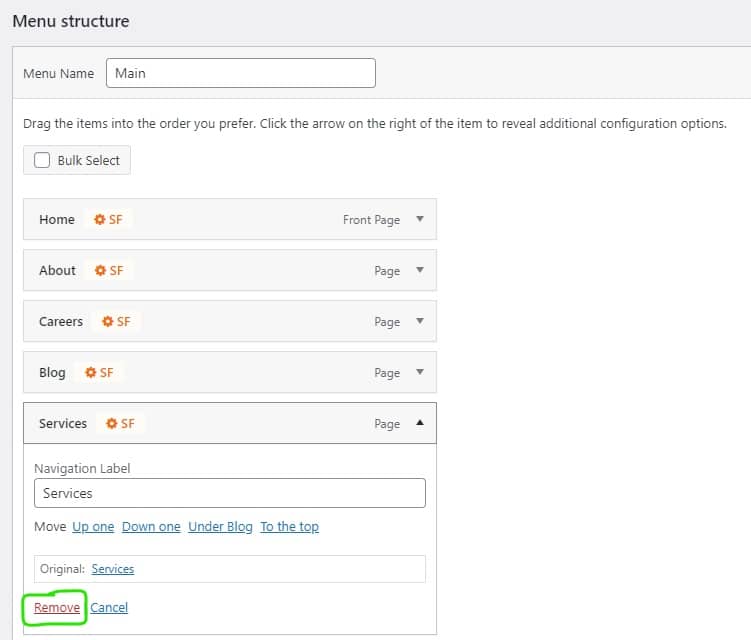
Find the gray tile with the page you want to delete
🛈 This only deletes the page from the menu. The page will still live under the Pages section
Click the black arrow to swivel open more settings. Here, you can click the Remove button. When you’re done, click Save Menu near the bottom of the page.
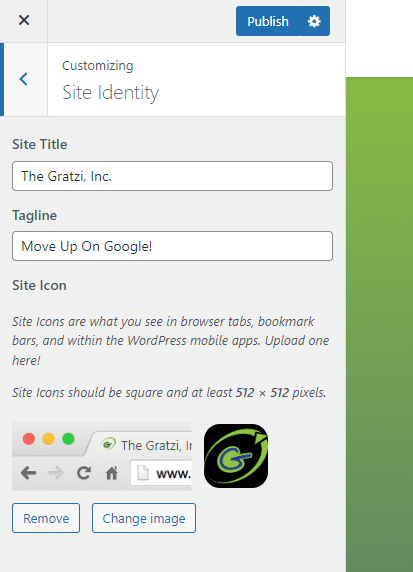
Editing Your Logo and Favicon
🛈 What is a Favicon? This is the little icon that is in the corner of the tab your website is open to. It also appears when someone creates a shortcut to your website on thier desktop or home screen.
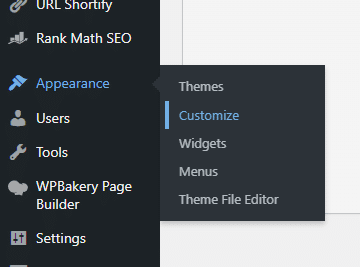
In the charcoal sidebar menu, hover over Appearance and click on Customize.
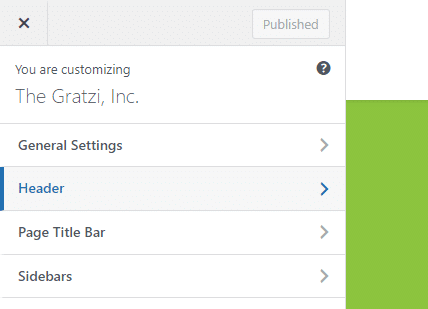
Click the Header menu
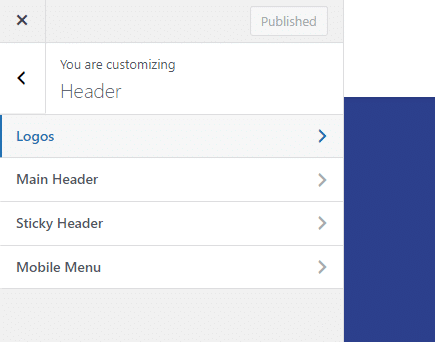
Click the Logos menu
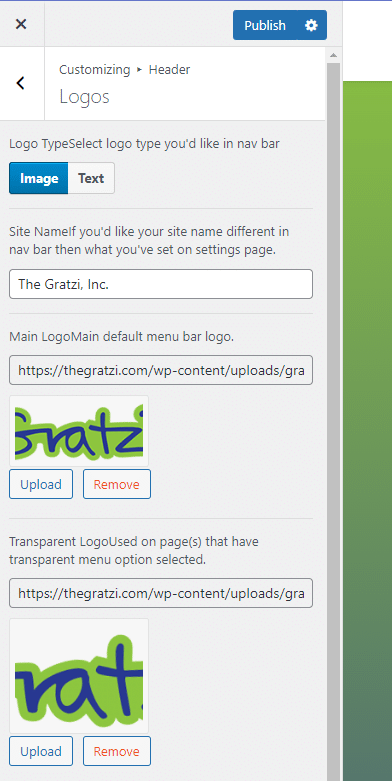
From here, you can change or edit the logo in the menu bar. Be sure to publish your changes!
Changing Your Favicon
In the charcoal sidebar menu, hover over Appearance and click on Customize.

Click the Header menu
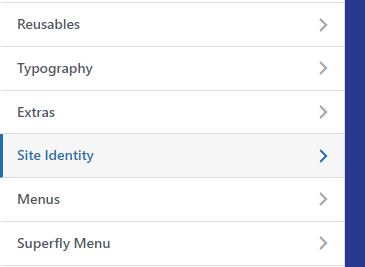
From here, you can change or edit the favicon logo in the menu bar. Be sure to publish your changes!
